
Review the related documentation to understand the NDD Orbix technical architecture, from an overview of the solution to the requirements for its deployment and monitoring.
By the end, you will understand how the solution is structured, how its components communicate with each other, and what the infrastructure requirements are for installation and monitoring.
1. About NDD Orbix
Learn about the NDD Orbix solution
NDD Orbix is a Workplace as a Service (WaaS) platform designed to centralize cloud monitoring and management of printers and various other devices in a single environment.
This 100% online solution is compatible with various browsers and serves small businesses to large corporations globally, offering complete visibility of the management processes of owned or leased devices.
With NDD Orbix, you can monitor and manage the health of your entire device fleet, facilitating more accurate and efficient decision making. The platform also promotes standardization of operations and cost reduction, leveraging NDD's expertise in equipment monitoring and management.
For more information, access NDD Orbix.
Explore the modules and features
Access detailed documentation to better understand the modules and features of NDD Orbix and discover how the platform can drive the sustainability of your business:


Printer Management
Features for printer management (meters, supplies, queues, and EcoPrint).
.png?cb=0c14612dc34a56b98e03cdbc9e4a3900)
Automation Devices Management (ADM)
Features for managing automation devices, such as thermal printers.
.png?cb=1d053a51be6f80c0900b3293087e68df)
Computer Insights
Features for managing computers and installed software.
Features:
Need help?
Key benefits for your operation
NDD Orbix is a robust, modern, and internationally recognized platform offering a number of advantages to our customers:

Data security and protection
Ensures data protection through encryption, authentication, and access control, maintaining high standards of security and compliance in all processes.

Reduced operating costs
Reduces expenses by automating processes and managing devices efficiently, with less need for local infrastructure, using unified and self-updating installers.

Increased
efficiency
Centralizes
control of devices and supplies, enabling proactive monitoring
and better management, while increasing the reliability of
operations.

Broad integration and compatibility
Compatible
with a
variety of manufacturers and devices, allowing for simplified and comprehensive integration.

Scalable SaaS
solution
Efficiently manages thousands of devices and users, facilitating service management and expansion with the support of data intelligence.

Sustainable practices and ESG
Contributes to sustainability by reducing waste and optimizing the use of inputs, promoting a more environmentally friendly and efficient operation.
What makes our solution different from others

Single installation agent
A single software agent manages multiple features, simplifying the distribution and expansion of functionalities.

Autonomy and
control
Intuitive interface that provides total visibility and control of features, with multi-level permissions.

Quick and easy activation
New features
are activated
remotely
through the portal, without the need for complex manual settings.
NDD Orbix offers control, security, and support for the growth of your business, adapting to your needs and providing greater operational efficiency.
2. Security and compliance
Review the documentation on information security, data protection, infrastructure, and certifications adopted by NDD Orbix to ensure information security and compliance with applicable laws
Security and compliance are fundamental pillars of NDD Orbix, reflecting our commitment to protecting our customers' information and ensuring the integrity of our services. In an ever-evolving digital landscape, where cyber threats are becoming increasingly sophisticated, we take a proactive approach to safeguarding data and meeting regulatory requirements.
Explore more about security and compliance
By accessing the documentation, you will have a clear understanding of the measures we take to ensure the security of your information and compliance with applicable legislation.

Documents
Describes the security infrastructure, data collection protocols and the V&V process.


Personal data
Explains the practices to ensure compliance with personal data protection legislations.
We believe that transparency is crucial to building and maintaining our customers' trust. We are always available to provide additional information about our security and compliance policies, as well as to answer any questions you may have.
3. Architecture
Understand the architecture and operation of the DCA and Cloud Connector agent, and how its services collect, process, and send information from monitored devices
The DCA and Cloud Connector is the monitoring agent for NDD Orbix, responsible for collecting, processing, and sending information from monitored devices to the platform’s portal. It establishes continuous communication between the devices in the customer’s environment and the NDD Orbix cloud, serving as an essential component for the solution’s operation.
In addition to the agent, the NDD Orbix architecture also supports monitoring through embedded modules (NDD Print Client Collector) on compatible printers.
Proper installation and configuration of the DCA and Cloud Connector ensure secure, centralized, and automated monitoring of the environment.
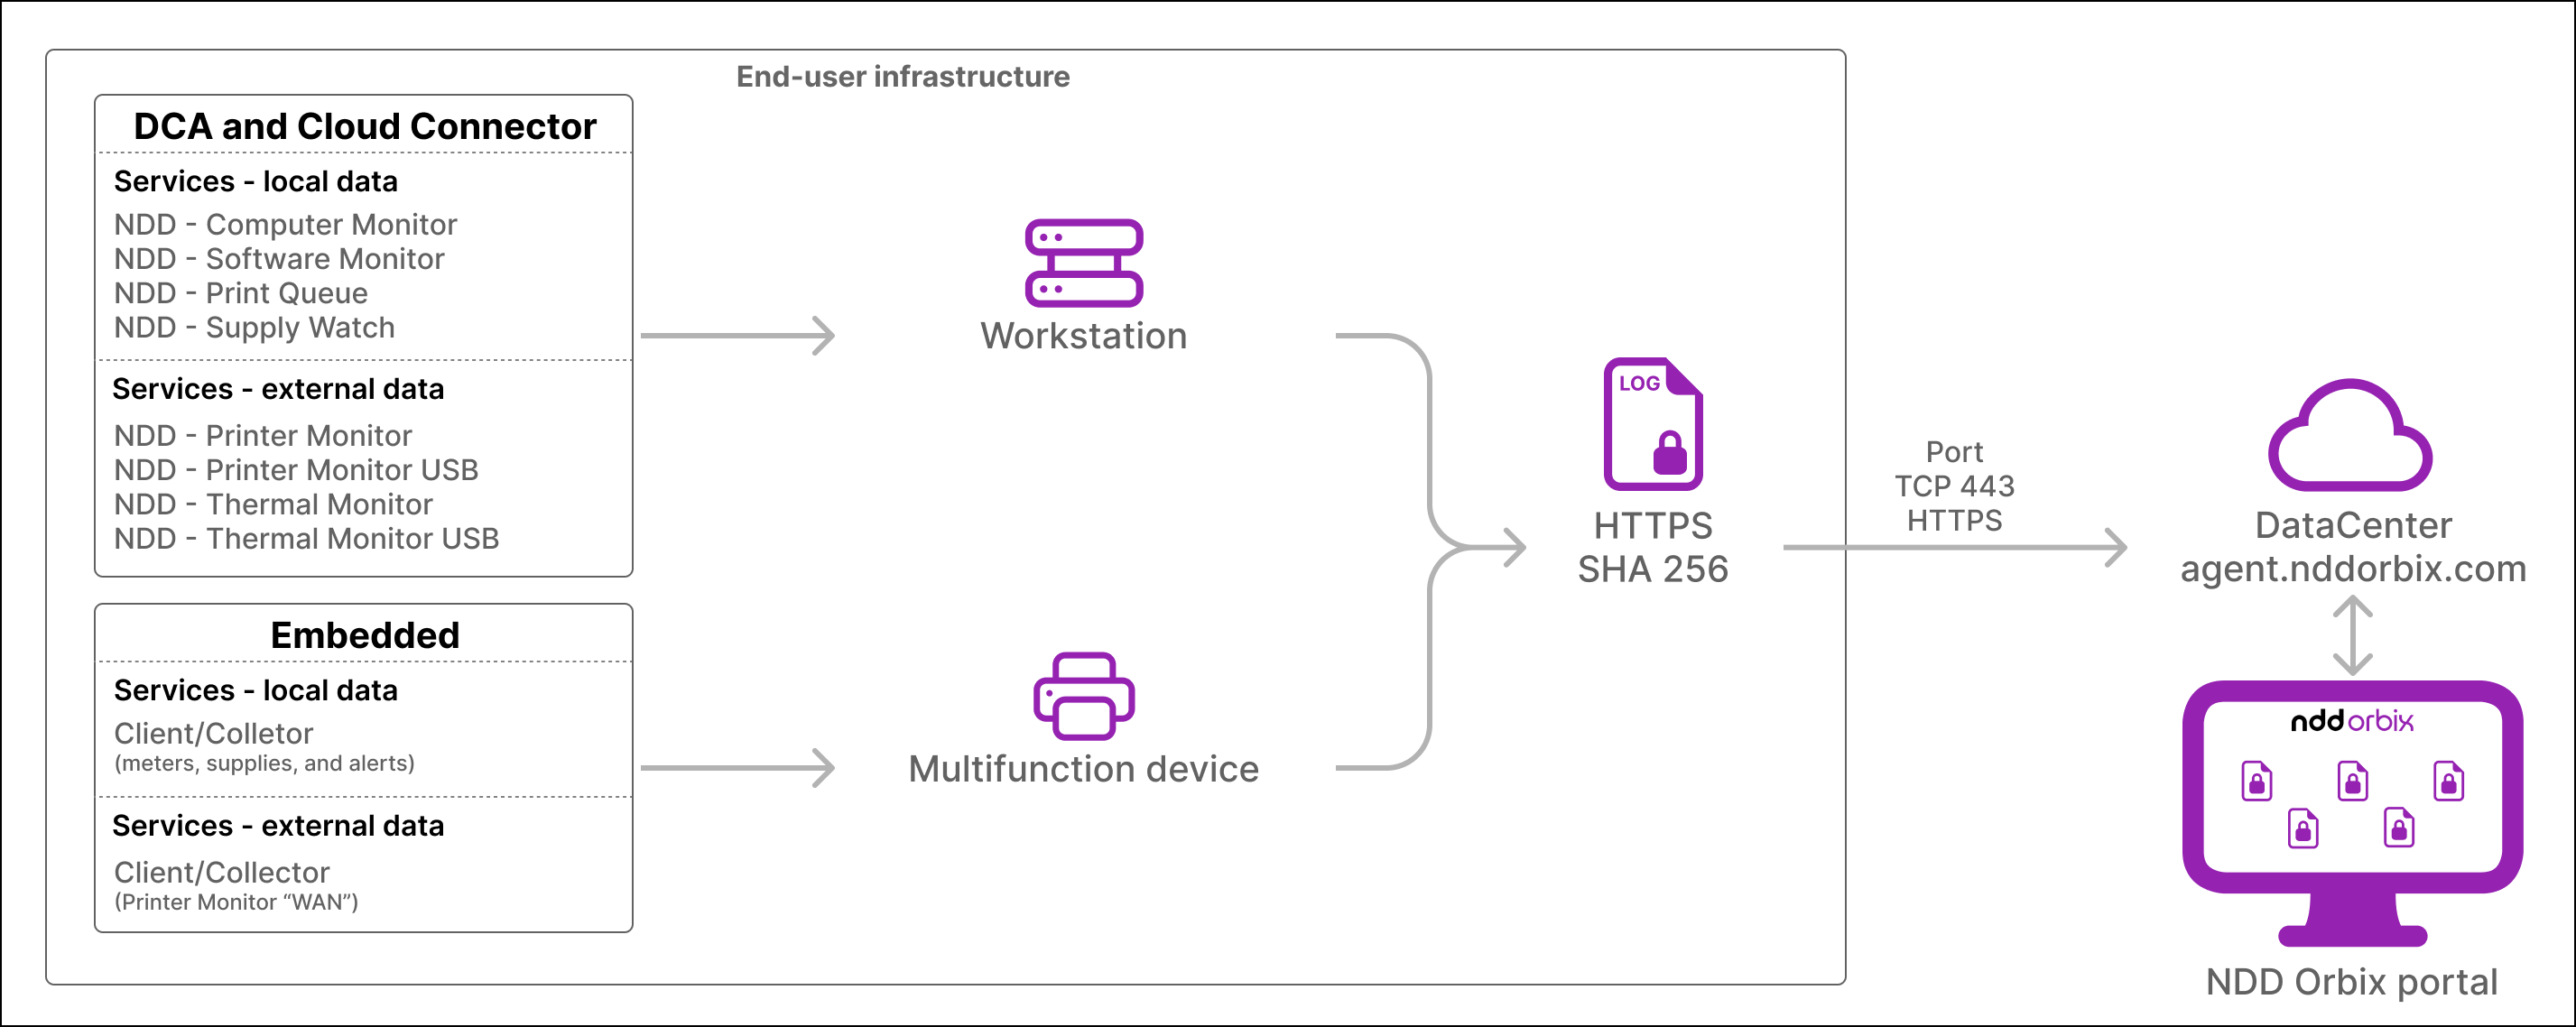
DCA and Cloud Connector
Objectives
The DCA and Cloud Connector serves the following objectives:
-
collect data from printers, thermal printers, computers, and software, including meters, odometers, supplies, events, and equipment statuses;
-
allow centralized device management through the NDD Orbix portal;
-
automate operational tasks, such as driver installation, print queue configuration, and the application of energy-saving policies (EcoPrint);
-
keep the solution’s components up to date at all times through the automatic update mechanism (LiveUpdate).
Architecture
The DCA and Cloud Connector is installed as the system’s main service. This is the only service configured for automatic startup and has two responsibilities:
-
to establish communication with the cloud and with the NDD Orbix portal via the NDD communication SDK;
-
to locally control and activate the other NDD Orbix agent services.
The other services are installed alongside the main agent but remain disabled until enabled by the NDD Orbix portal, according to the configuration set for each environment. Each service is independent, starts manually, and is automatically launched by the main agent when necessary.
Data collection is performed based on the device type, using protocols such as SNMP, HTTP, TCP, and USB.
Available services
The DCA and Cloud Connector is available for Windows and Linux, but not all services are supported on both operating systems.
In addition, each service collects specific information according to its purpose.
Services available on Windows
|
Service |
Name on Windows |
Function |
|---|---|---|
|
DCA and Cloud Connector |
nddSmart.DCA.Agent |
The main service responsible for communicating with the portal and managing the other services. It also collects basic local information about the computer on which it is installed. Data collected by DCA and Cloud Connector
|
|
NDD - Printer Monitor |
NDDPrinterMonitor |
Monitors printers connected via a network or WAN using the SNMP and NPAP protocols, collecting information on inventory, meters, supplies, and events. Data collected by NDD - Printer Monitor
|
|
NDD - Printer Monitor USB |
NDDPrinterUsbMonitor |
Monitors printers connected via USB, collecting information on inventory, meters, supplies, and events. Functionality depends on the equipment’s compatibility. We recommend checking with a brand specialist. Data collected by NDD - Printer Monitor USB
|
|
NDD - Thermal Monitor |
NDDThermalMonitor |
Monitors thermal printers connected via a network or WAN, collecting inventory, odometers, supplies, and events. Data collected by NDD - Thermal Monitor
|
|
NDD - Thermal Monitor USB |
NDDThermalMonitorUSB |
Monitors thermal printers connected via USB, collecting inventory, odometers, supplies, and events. Data collected by NDD - Thermal Monitor USB
|
|
NDD - Computer Monitor |
NDDComputerMonitor |
Monitors computers, collecting information on hardware, operating system, resource usage, and events. Data collected by NDD - Computer Monitor
|
|
NDD - Software Monitor |
NDDSoftwareMonitor |
Monitors the software installed on the computer, including manufacturer, version, installation date, resource usage, and events. Data collected by NDD - Software Monitor
|
|
NDD - Print Queue |
NDDPrintQueue |
Monitors drivers and print queues, allowing for their installation and management. Data collected by NDD - Print Queue
|
|
NDD - Supply Watch |
NDDSupplyWatch |
Applies saving rules (EcoPrint) to monitored equipment. Data collected by NDD - Supply Watch
|
Services available on Linux
|
Service |
Function |
|---|---|
|
DCA and Cloud Connector |
The main service responsible for communicating with the portal and managing the other services. It also collects basic local information about the computer on which it is installed. Data collected by DCA and Cloud Connector
|
|
NDD - Printer Monitor |
Monitors printers connected via a network or WAN using the SNMP and NPAP protocols, collecting information on inventory, meters, supplies, and events. Data collected by NDD - Printer Monitor
|
|
NDD - Printer Monitor USB |
Monitors printers connected via USB, collecting information on inventory, meters, supplies, and events. Functionality depends on the equipment’s compatibility. We recommend checking with a brand specialist. Data collected by NDD - Printer Monitor USB
|
Warning
Linux only supports monitoring services for network and USB printers. The other services are available exclusively for Windows.
Information
To see which operating systems are compatible with the DCA and Cloud Connector, access Which operating systems are compatible with DCA and Cloud Connector?.
Files generated by DCA and Cloud Connector
During the process, DCA and Cloud Connector generates files in .JSON format, with approximately 400 bytes per file, containing the data collected by each service. Each file contains information for 1 device.
Note
The LocalSystem account is used to run all services internally on Windows, as the installers do not allow you to specify a specific service account for cybersecurity reasons. This means that the services run as NT AUTHORITY\SYSTEM.
Communication with the portal
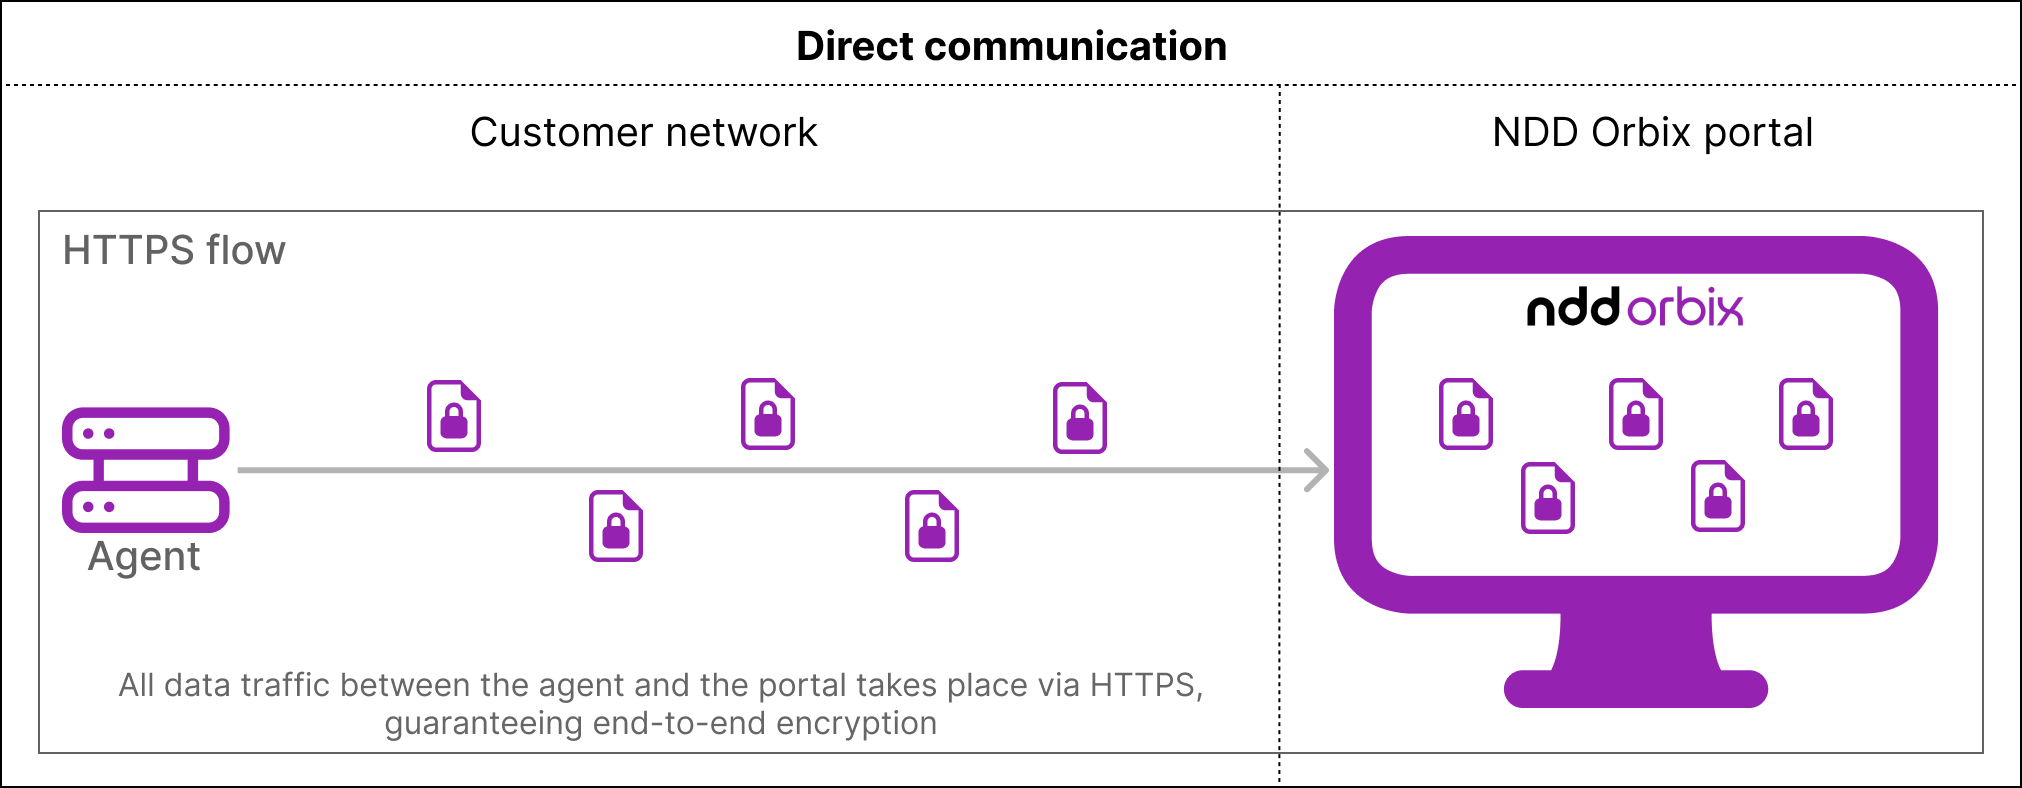
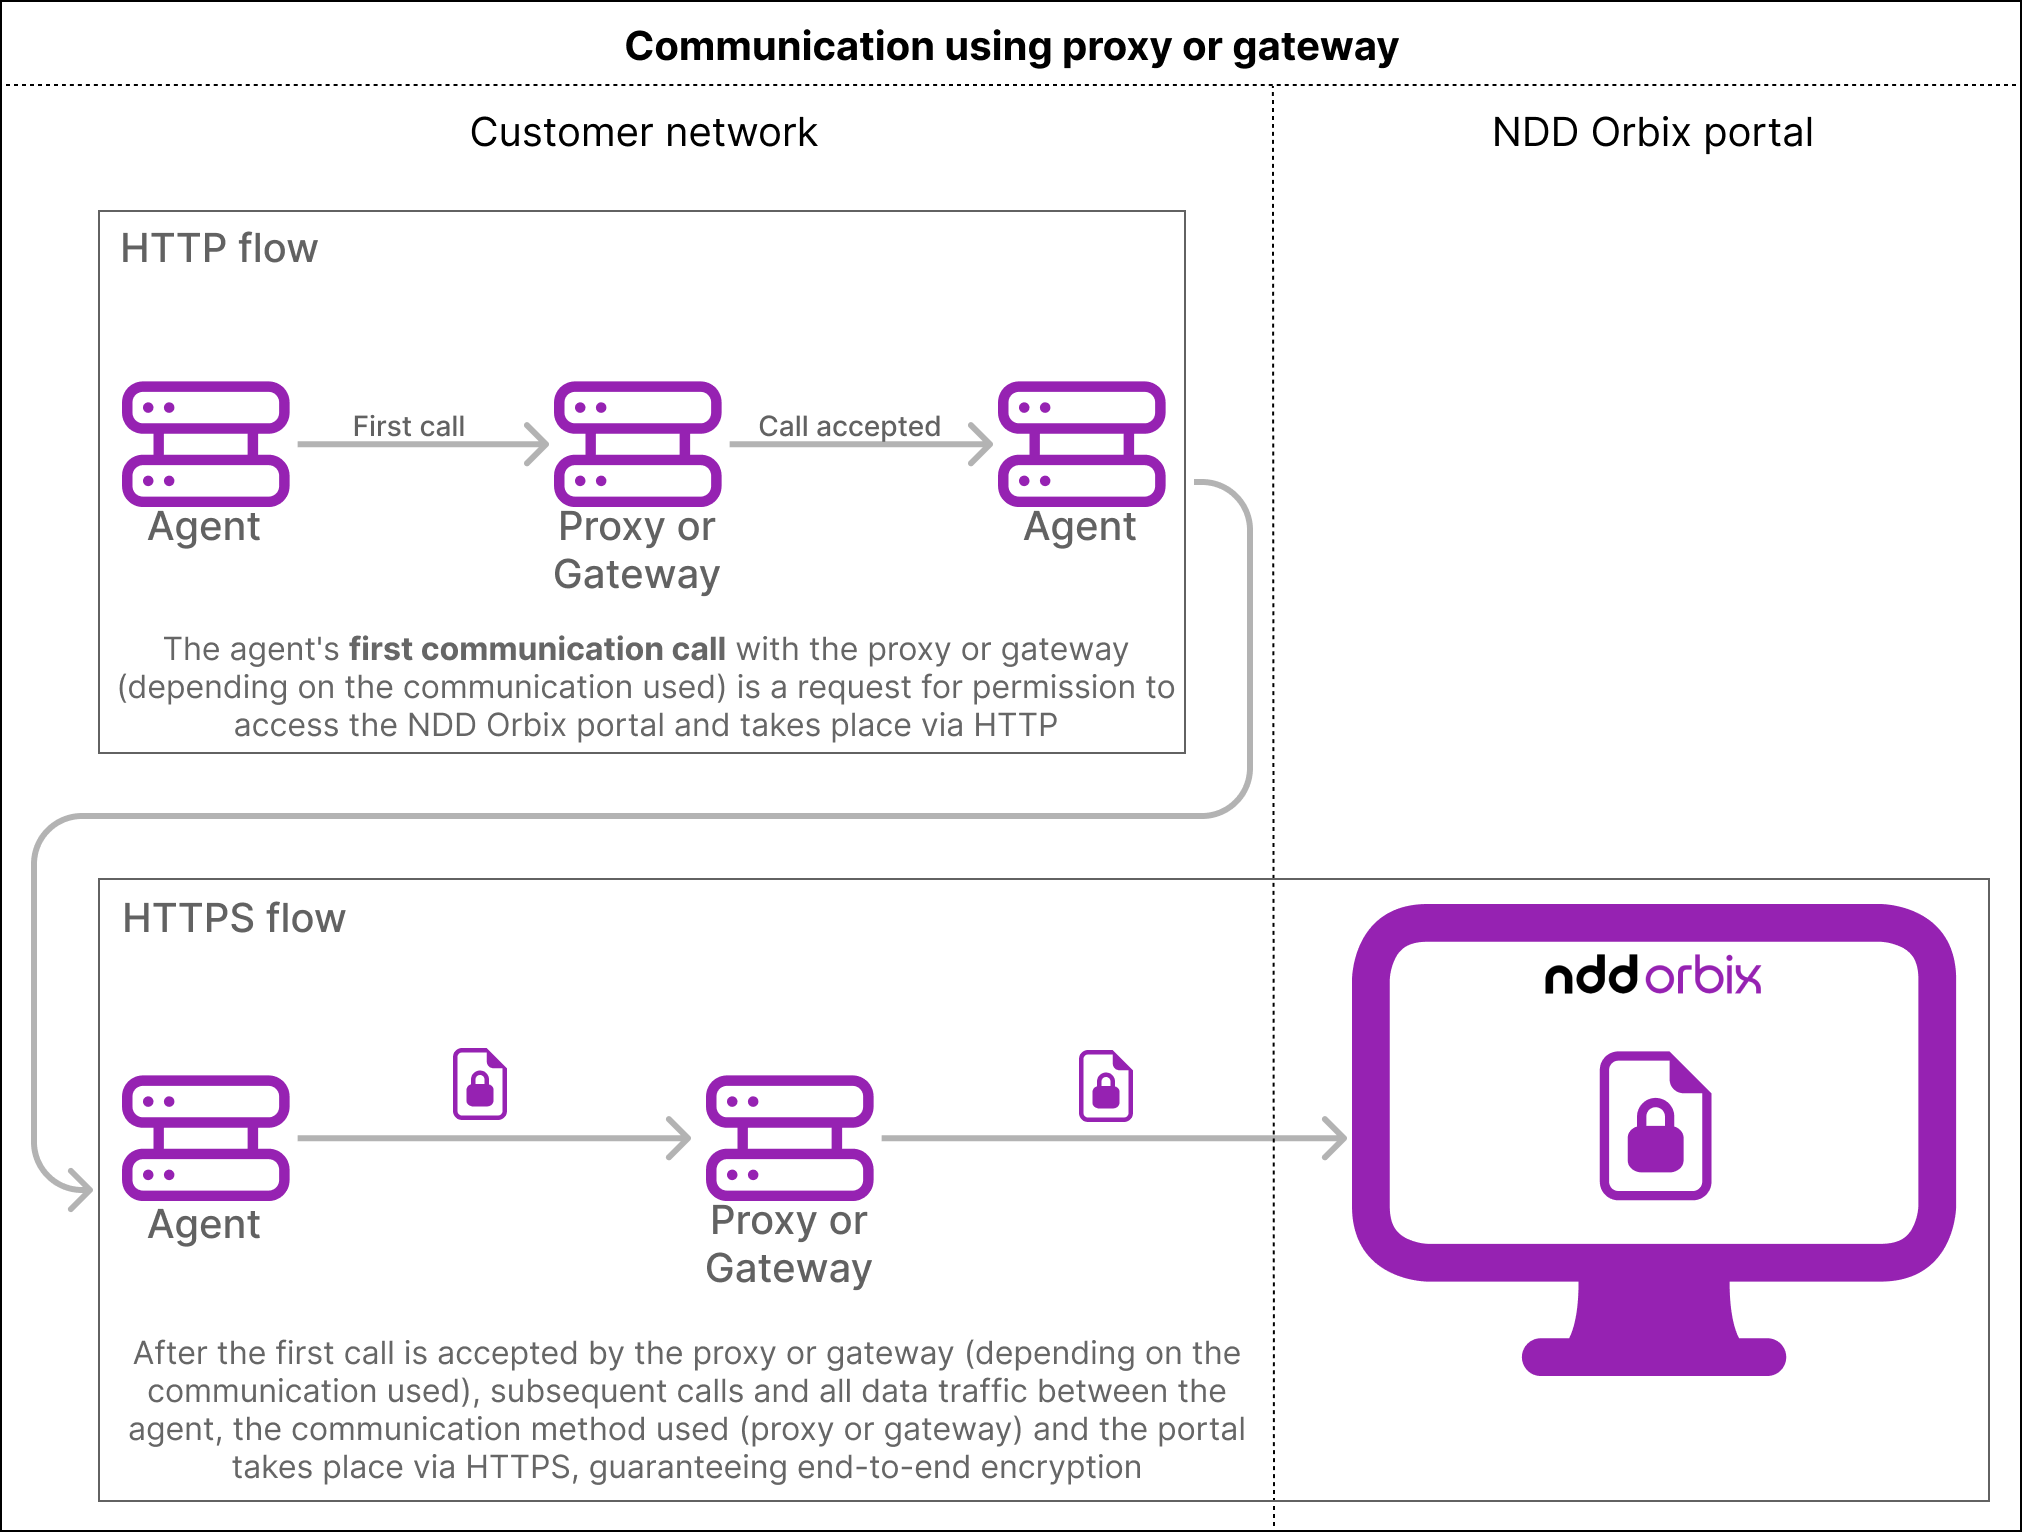
The DCA and Cloud Connector can communicate with the NDD Orbix portal in three ways, depending on the customer’s infrastructure:
-
Direct communication: The agent communicates directly with the portal when no proxy or gateway is configured.
-
Proxy: A feature of the customer’s infrastructure responsible for mediating communication between devices and the internet.
-
Gateway Connector: uses a gateway provided by NDD, which acts as an intermediary for communication between the agents and the portal and caches data for certain solution features.
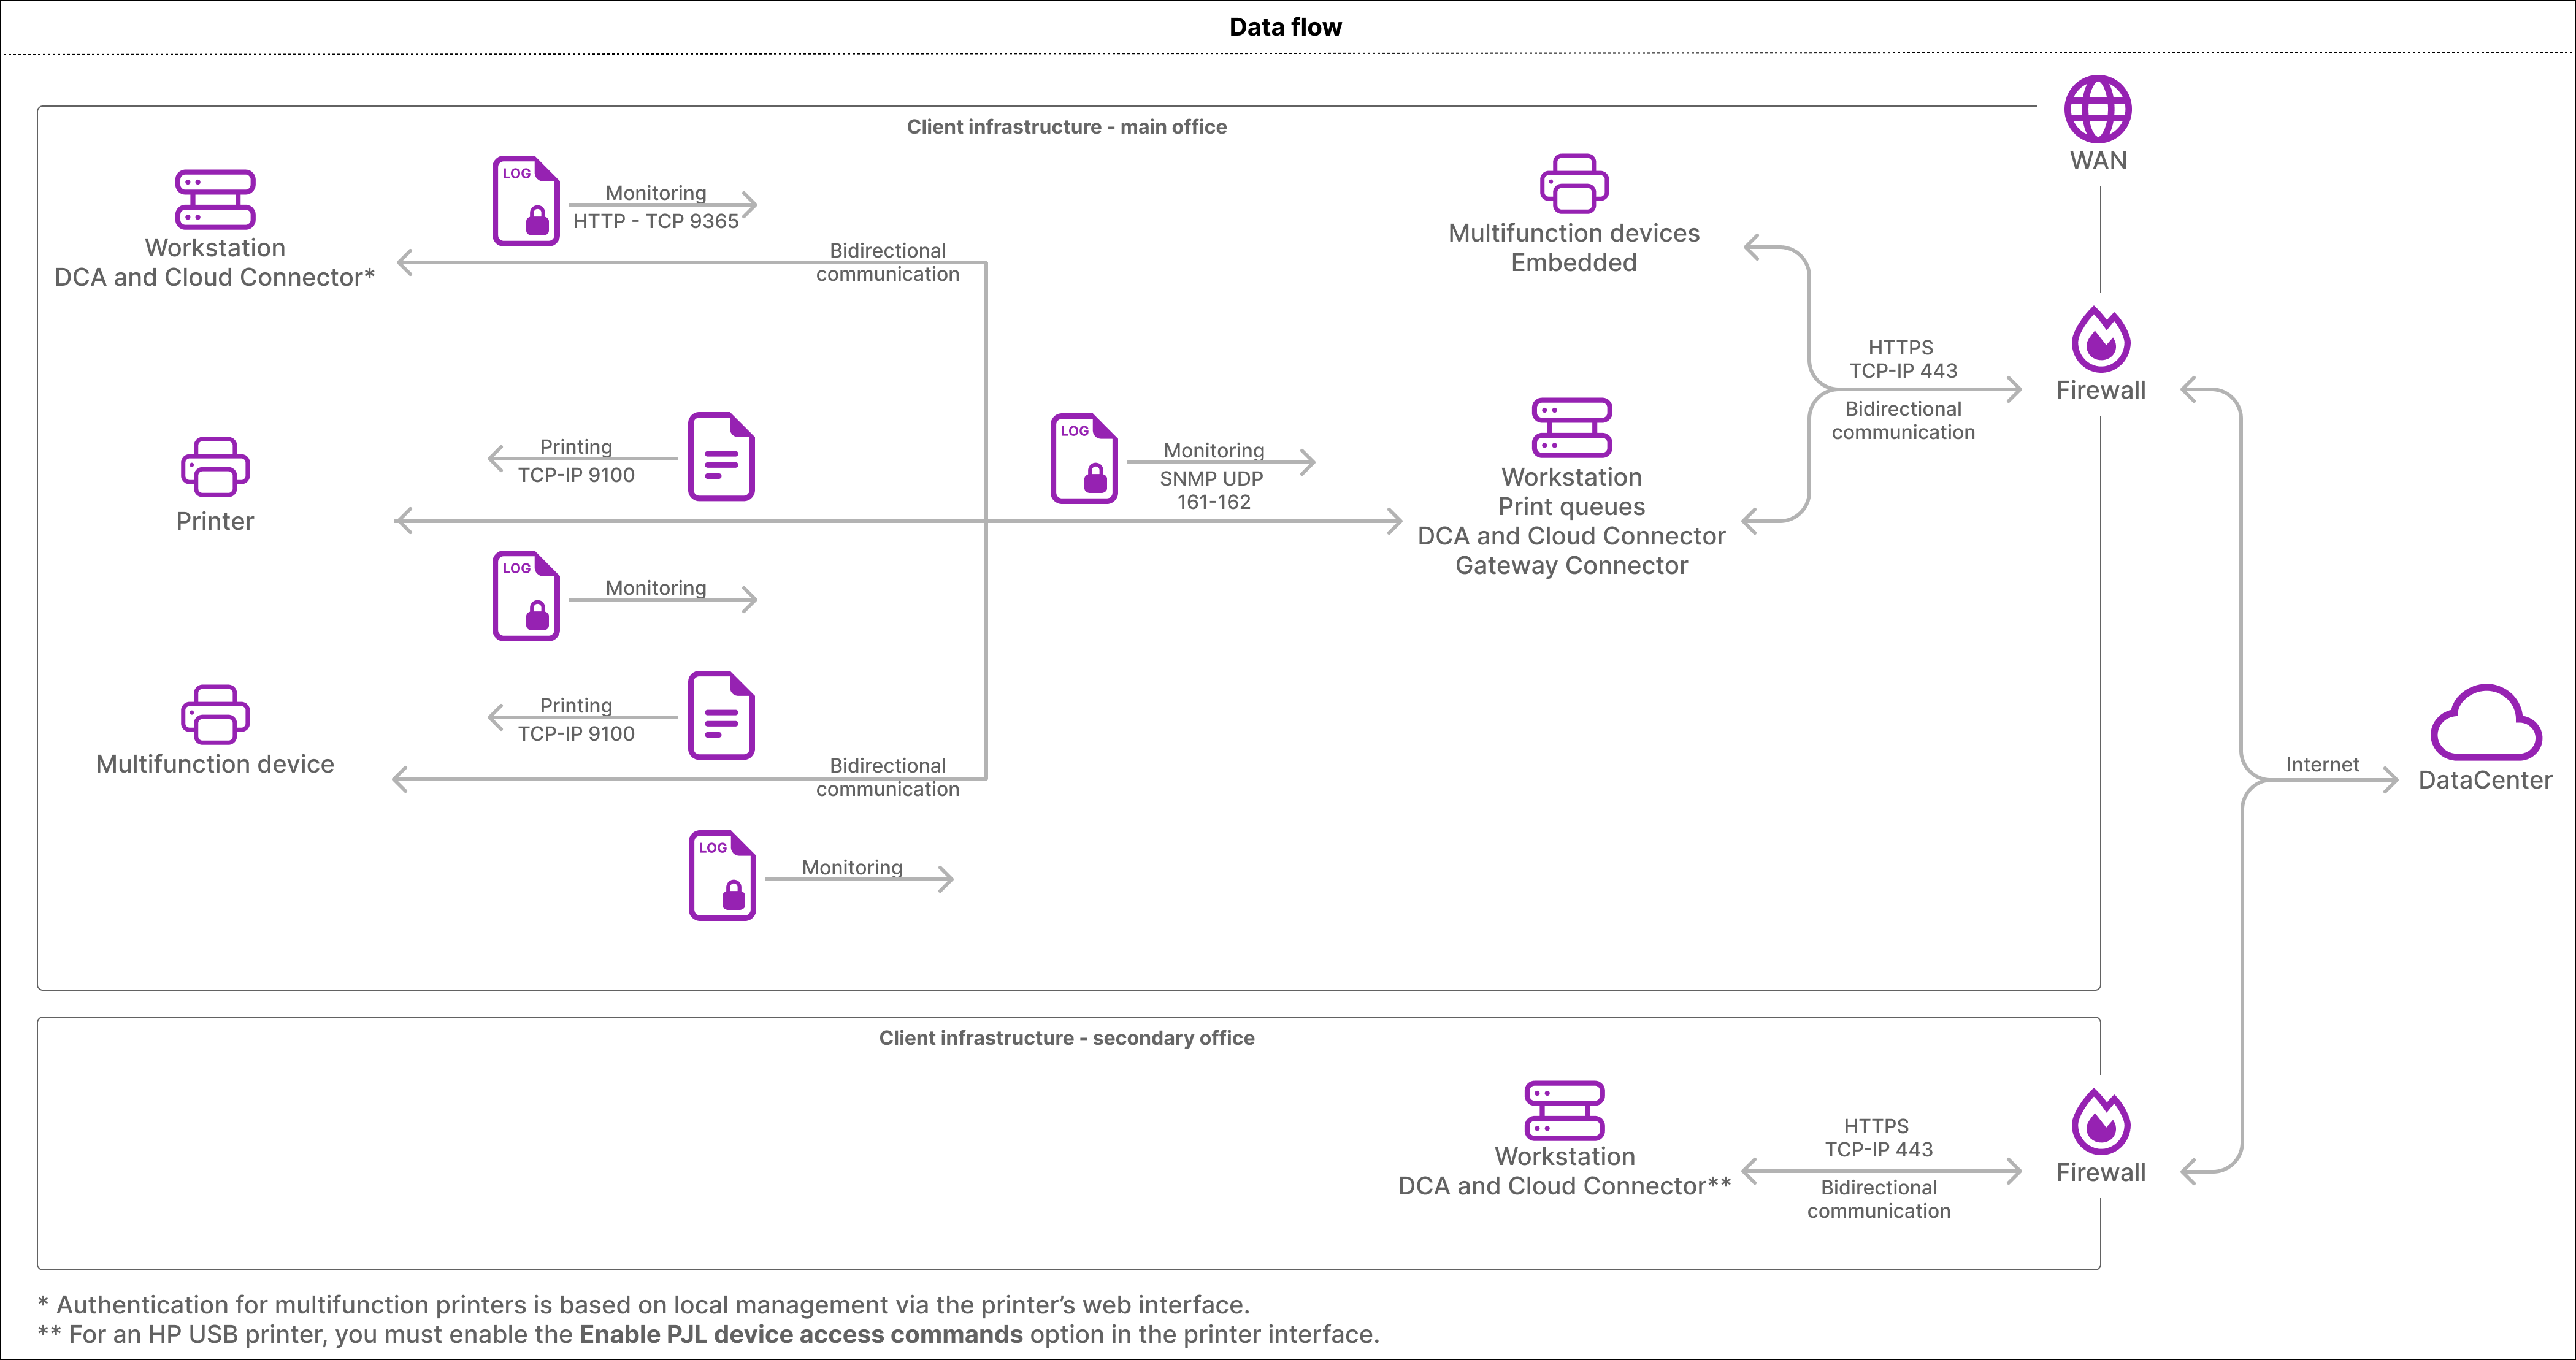
The communication flow occurs as follows:
NDD Print Client Collector
Currently, this technology is available for equipment from the following manufacturers: HP Workpath, Kyocera, Lexmark, and Ricoh Android, eliminating the need for an agent to collect information from these devices.
To collect data via embedded modules, NDD Orbix uses two NDD Print products:
-
NDD Print Client Collector: software that runs on the printing device’s operating system. It allows you to monitor meters, supply status, and alerts for a single device or multiple devices via network/WAN communication and the SNMP protocol.
-
Embedded Configuration Tool (ECT): software for Windows environments that allows you to configure devices before the installation of the embedded Collector module.
Information
To check device compatibility, access the Manufacturer Compatibility Guide.
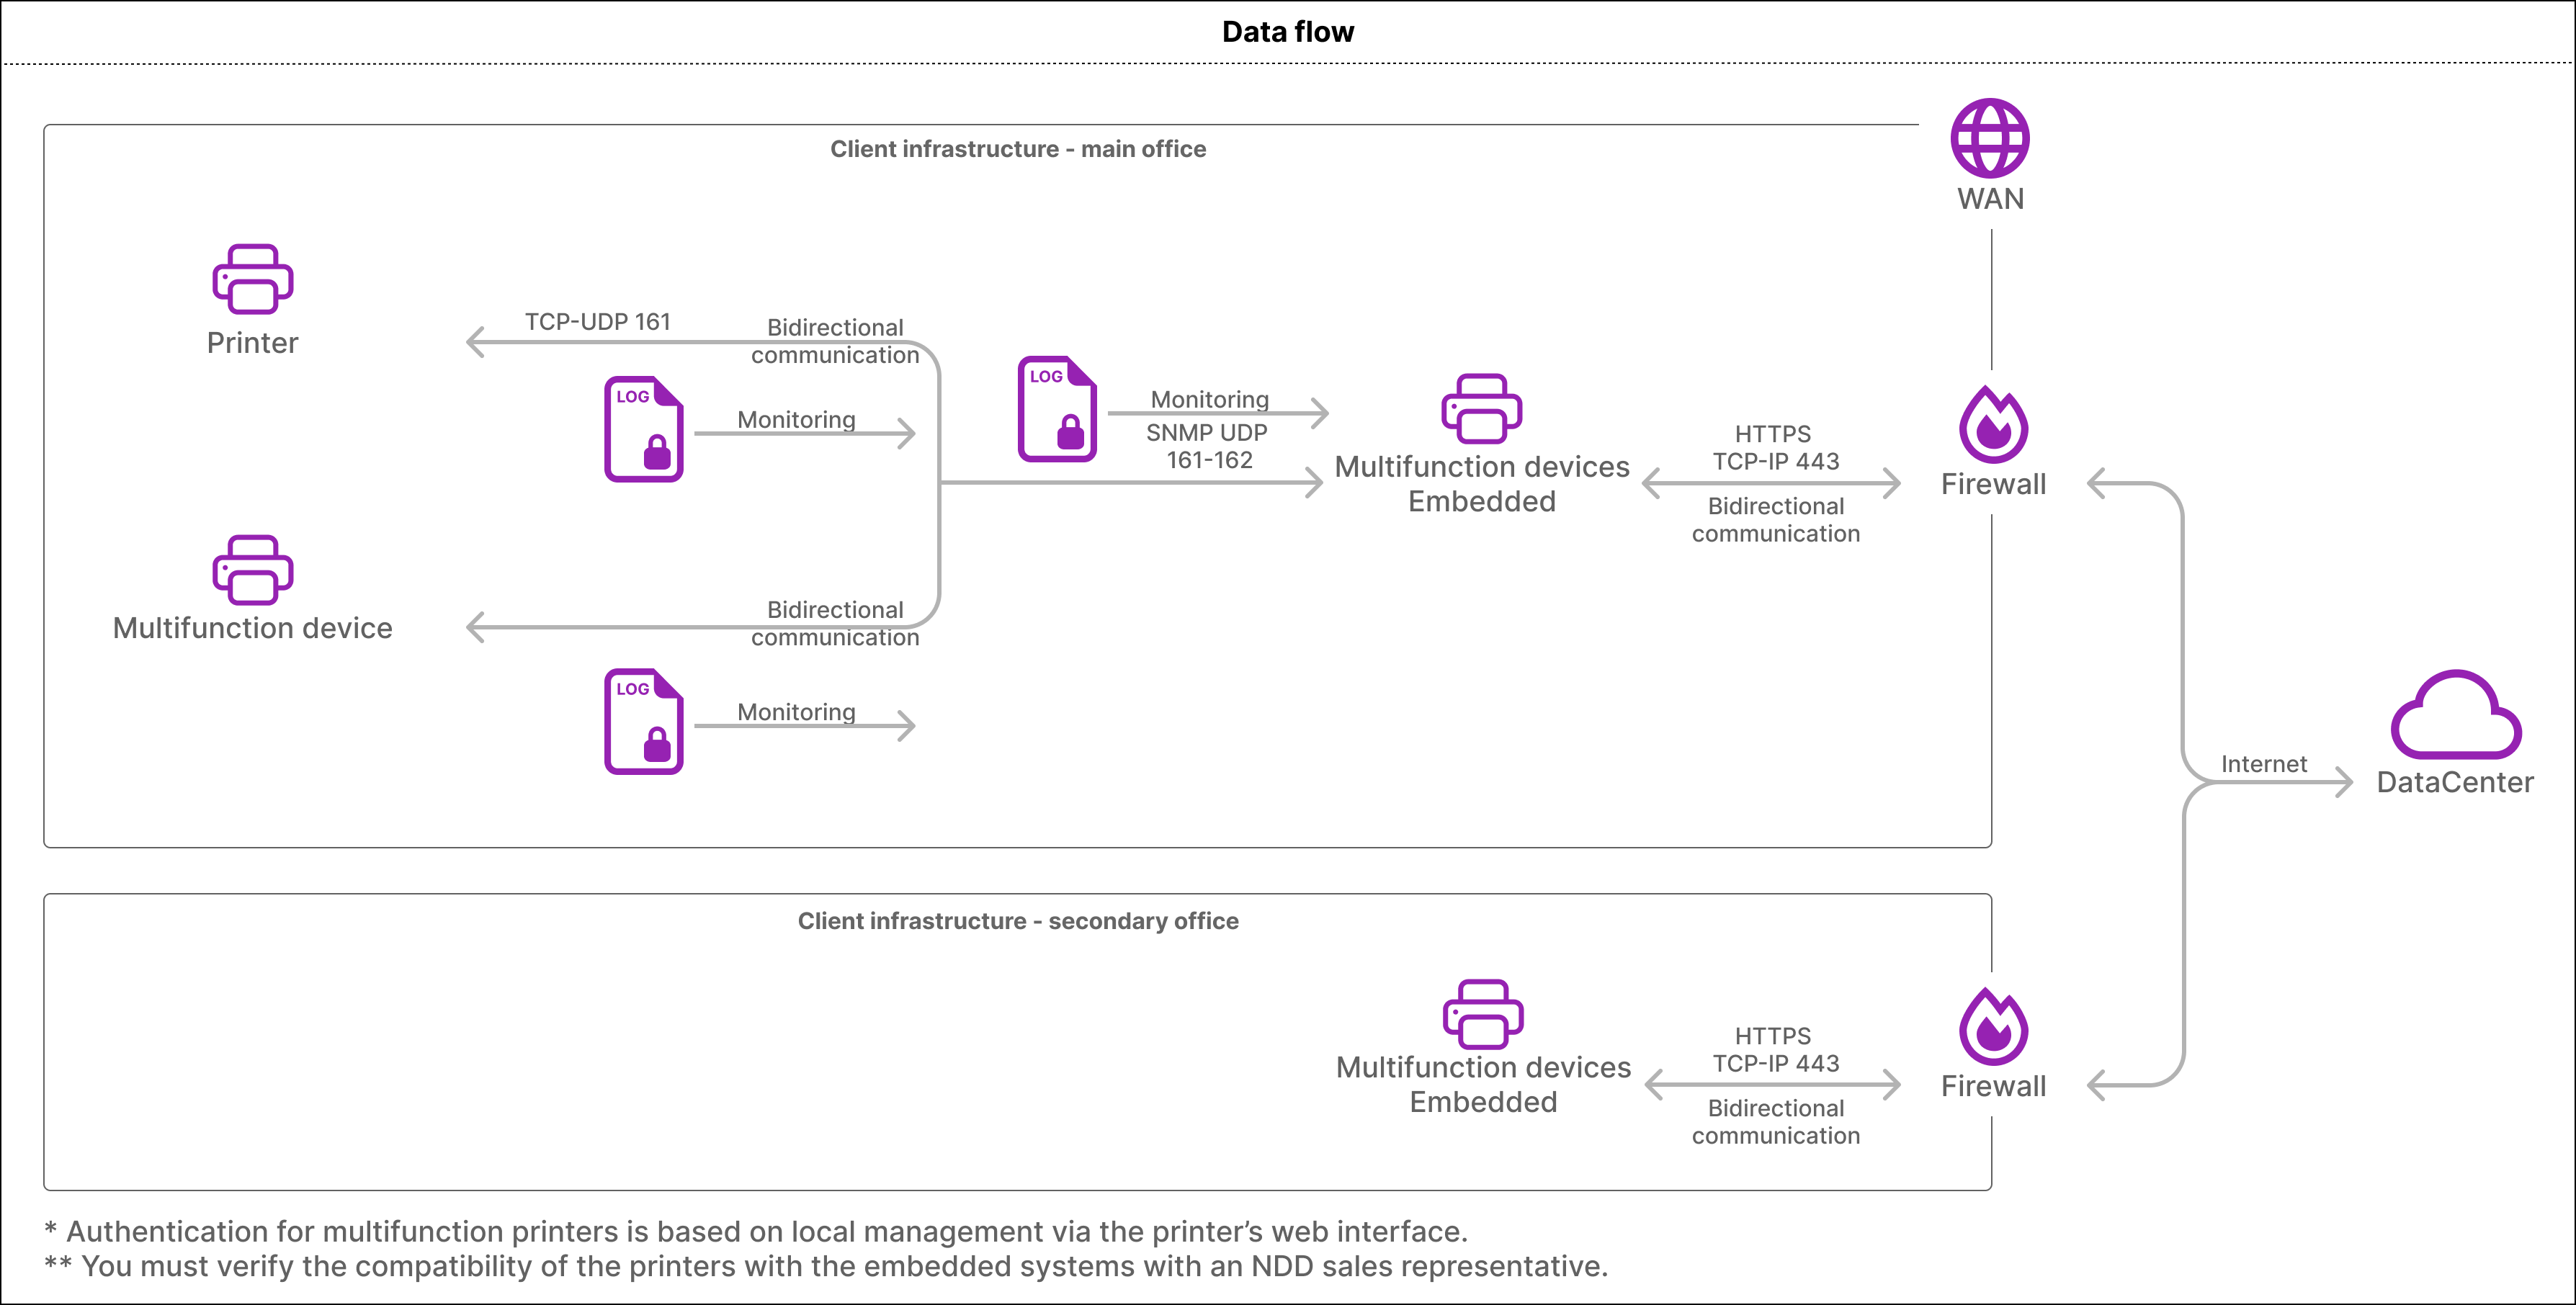
Prerequisites for the NDD Print Client Collector and the ECT
See the specific prerequisite documentation for each manufacturer and for the ECT:
Installation of the NDD Print Client Collector and the ECT
See the specific installation documentation for each manufacturer and for the ECT:
-
Embedded Configuration Tool (ECT)
-
ECT configuration by manufacturer:
-
Files generated by NDD Print Client Collector
The embedded modules generate:
-
files in the .NSL format, approximately 4 KB per file, containing meter and supply data. Each file contains information for up to 200 devices.
-
files in the .NPA format, approximately 4 KB per file, containing event and alert data. Each file contains information for 1 device.
For detailed instructions on installation, configuration, and updating the agent, see the following documentation:
-
Prerequisites for installing the DCA and Cloud Connector agent -
Prepare the environment for installation on Linux -
Install the DCA and Cloud Connector agent on Linux (Ubuntu and Ubuntu-based distributions) -
Install the DCA and Cloud Connector agent on Linux (other distributions) -
Change DCA and Cloud Connector agent communication on Linux -
Remove the DCA and Cloud Connector agent on Linux (Ubuntu and Ubuntu-based distributions) -
Remove the DCA and Cloud Connector agent on Linux (other distributions) -
Update the DCA and Cloud Connector agent, Gateway Connector, or services version via the portal -
Current versions of the DCA and Cloud Connector agent, Gateway Connector, and services
4. DCA and Cloud Connector installation prerequisites
Review the hardware, software, environment, and approved operating system requirements for the DCA and Cloud Connector agent
The necessary prerequisites for installing the DCA and Cloud Connector agent are:
Hardware
Minimum configurations
-
Processor: Dual-Core 1.7GHz
-
Memory: 4gb or higher
-
Disk space: 10gb or higher
Recommended configurations
-
Processor: Octa-Core 2.6GHz
-
Memory: 16gb or higher
-
Disk space: 60gb or higher
Note
-
Memory and processing consumption may vary depending on the number of printers monitored and print volume generated.
-
Network performance affects the resource consumption of DCA and Cloud Connector services.
-
For environments monitored by SNMP V3, contact NDD to assess the required hardware requirements.
-
We recommend using server processors as they have substantial differences compared to a desktop processor.
Software
Minimum configurations for Windows
-
Microsoft .NET Framework: version 4.7.0 or higher.
Requires prior installation. -
Microsoft .NET Runtime: version 8.0.21 or higher.
Included in the DCA and Cloud Connector installer. -
Microsoft ASP.NET Core Runtime: version 8.0.21 or higher.
Included in the DCA and Cloud Connector installer. -
EpsonNet SDK for Windows: for monitoring Epson printers connected via USB, the EpsonBidirectionalService service (installed via the EpsonNet SDK for Windows application) must be running.
Included in the DCA and Cloud Connector installer. -
NDD - Queues Monitor: a component integrated with the DCA and Cloud Connector agents, required for the NDD - Supply Watch service to function.
Included in the DCA and Cloud Connector installer.
During the installation process on Windows, the installer will automatically check whether NDD - Queues Monitor, Microsoft .NET Runtime, Microsoft ASP.NET Core Runtime, and EpsonNet SDK for Windows are already present on the computer. If any of them are not present, the installation will be performed automatically.
Do not uninstall Microsoft .NET Runtime and Microsoft ASP.NET Core Runtime, and do not stop the EpsonBidirectionalService service. These components are essential for the proper functioning of the DCA and Cloud Connector agent and its associated services.
Minimum configurations for Linux
For a correct installation on Linux, root or superuser permissions are required to perform the operating system setup tasks and download the application.
The environment must be set up in accordance with the approved distribution.
To download the applications, you must allow two-way communication with packages-orbix.ndd.tech.
Incompatibilities
-
NDD Print Agent: versions 5.25 through 5.30.
The DCA and Cloud Connector is not compatible with versions 5.25 through 5.30 of the NDD Print Agent. To install or update the DCA and Cloud Connector in environments using these versions, you must first update the NDD Print Agent to version 5.31.0 or later. After updating the NDD Print Agent to a compatible version, you can perform the installation or update of the DCA and Cloud Connector as usual.
Environment
Minimum configurations
-
Ports 161 and 162 - UDP: SNMP communication enabled for communication with printing equipment.
-
Ports 9300, 9301, 9302, 9500, and 9501: NPAP communication enabled for communication with printing equipment.
-
Port 50501 - UDP: UDP communication enabled for communication with Zebra thermal equipment to collect alerts.
-
Port 58564 - TCP/IP: HTTP communication enabled for processing print jobs from the EcoPrint feature.
-
Port 443 - TCP/IP (proxy): communication between the proxy and the portal.
-
Port 443 - TCP/IP (gateway): communication between the gateway and the portal. This port must be open for external access only on the computer/server where the Gateway Connector will be installed.
-
Port 9635 - TCP/IP (gateway): communication between the agent and the gateway. The port must be open on the internal network to allow the agent and services to view the Gateway Connector.
Local network communications
|
Rule |
Direction |
Port/Protocol |
Applicable services |
Notes |
|
SNMP (query + discovery) |
Agent → device |
UDP 161 |
|
Used for collecting meters and supplies in the print/supply collectors. In NDD - Print Queue, it is used only to identify the printer during queue administration. |
|
Raw print / ZPL / Fingerprint / FBPL |
Agent → device |
TCP 9100 |
|
- |
|
Zebra alerts (device push) |
Device → agent (inbound) |
UDP 50501 (alert reception port, default) |
|
Proprietary UDP server for Zebra alerts. Enable only if Zebra alert monitoring is active. |
|
ICMP echo (discovery pre-check) |
Agent → device |
ICMP echo (optional, controlled by configuration) |
|
Blocking this hinders interval-based discovery. |
|
Job hub (local listener) |
Local / inbound on interface |
TCP 57564 (HTTPS) 58564 (HTTP) |
|
Queue/job functionality, unnecessary for primary meter/data collection. If enabled, restrict to loopback/trusted segment; the embedded web server listens on all network interfaces (0.0.0.0), WITHOUT authentication, and exposes job metadata. |
|
Notification channel (loopback) |
Local (loopback) |
TCP 58564 (http://127.0.0.1:58564/Jobs) |
|
Local/loopback rule, applicable only if local integration with NDD - Queues Monitor is enabled. |
|
SNMP traps |
Device → agent (inbound) |
UDP 162 |
|
Enable within the meter and supply collection scope for compatibility with environments/devices that use SNMP events. In the audited code, events are obtained via SNMP polling, and Zebra alerts are received via UDP 50501. |
|
NPAP |
Agent ↔ device |
TCP 9300/9301/9302/9500/9501 |
|
Enable printer fleet compatibility in the context of meter and supply collection, when required by the device model/certification. |
|
HTTP to the device |
Agent → device |
TCP 80/443 |
|
The NDD - Printer Monitor may need to make HTTP calls to collect data from printers, depending on the device’s certification and model. |
|
RAW / LPR |
Agent → device |
TCP 9100 / TCP 515 |
|
Supplementary work function for print queues/ports. Not required for the main meter/supplies collection. Its firewall rules should be processed as conditional and not as prerequisites for the main meter/supplies collection. Authorize only if print queue/port management is authorized. |
External communications
|
Destination (FQDN) |
IP |
Port |
Protocol |
Whitelist note |
|
portal.nddorbix.com |
40.79.67.212 |
443 |
HTTPS/REST |
Current primary host for SDK/portal: authentication, endpoint discovery, remote settings, heartbeat, events, real-time updates, and the DCA and Cloud Connector layers. |
|
agent.nddorbix.com |
20.161.218.182 |
443 |
HTTPS/REST |
Used only for logs. |
|
storbixprod-e2htfcfmf4azcjd2.a02.azurefd.net |
Dynamic |
443 |
HTTPS (download) |
Download update packages via Azure Front Door. Access via FQDN. |
|
packages-orbix.ndd.tech |
Dynamic |
443 |
HTTPS (download) |
Required for installation/updates on Linux only. Access via FQDN. |
|
ip-api.com |
Dynamic |
80 |
HTTP |
The traffic is external, HTTP, and third-party. Used on demand by NDD - Computer Monitor for geolocation via public IP. Optional rule/outside the scope of meters and supplies. Allow only if this functionality is authorized. |
For more details on how the communication flow takes place, go to Configure the DCA and Cloud Connector agent.
Web service
-
Web service used by DCA and Cloud Connector to receive/send data:
Data Center Global and Data Center Europe: http://agent.nddorbix.com.
Sends application monitoring data (server, services, and logs) to NDD Orbix.
Information
When accessing http://agent.nddorbix.com via your browser, you will view a 404 error. This is expected behavior, as the address is only used for agent communication via web service.
Raspberry Pi
-
Device model: Raspberry Pi 3 Model B or higher.
-
Operating system: Ubuntu 24.04 or higher (64-bit).
-
Storage: 8gb microSD card or higher.
-
Connection: local network that allows communication with the NDD Orbix server services.
Startup Type (ST)
-
DCA and Cloud Connector: Automatic.
-
Attached services: Manual.
Services installed with DCA and Cloud Connector remain with the Startup Type (ST) set to Manual, as the responsibility for starting and stopping these services lies solely with the agent itself. Only DCA and Cloud Connector should have the ST set to Automatic.
Starting with version 1.2.0, the DCA and Cloud Connector agent automatically checks the ST of each service. If it identifies any service configured as Automatic, it will automatically be adjusted to Manual.
Do not change the TI of services to Automatic, as this may compromise the correct functioning of the agent and its associated services.
HP USB printers
-
Check the Enable PJL Device Access Commands option in the Security > General Security of device web section to ensure proper monitoring of HP USB printers.
EcoPrint
-
PCL6 language driver.
To ensure the solution functions correctly, NDD Orbix components automatically monitor and adjust certain configurations in the print queues.
The NDD - Queues Monitor component automatically monitors and configures the following parameters:
-
Advanced tab in the driver properties:
-
Start printing after last page is spooled: enabled.
-
Print spooled documents first: enabled.
-
Keep printed documents: disabled.
-
-
Sharing tab in the driver properties (for shared queues only):
-
Render print jobs on client computers: disabled.
-
Warning
The settings apply to all print queues on the computer, including those not linked to EcoPrint or NDD Orbix (printers not registered with or monitored by the platform).
The NDD - Supply Watch service automatically monitors and configures the following parameter:
-
Advanced tab in the driver properties:
-
Enable advanced printing features: disabled. If this option remains enabled, the driver language may change during printing, preventing the savings from taking effect.
-
Warning
This configuration applies to all print queues associated with monitored and managed printers by NDD Orbix.
Approved operating systems
DCA and Cloud Connector are certified for installation and operation on the following versions of Windows and Linux distributions/versions:
-
Windows
-
Windows 10, 64 bits (x64)
-
Windows 11 Enterprise, 64 bits (x64)
-
Windows Server 2016 Standard Edition, 64 bits (x64)
-
Windows Server 2019 Standard Edition, 64 bits (x64)
-
Windows Server 2022 Standard Edition, 64 bits (x64)
-
-
Linux
-
Fedora 38 ou superior (x64)
-
Ubuntu 20.04 ou superior (x64)
-
Debian 12 ou superior (x64)
-
Mint 22 ou superior (x64)
-
5. Installing the DCA and Cloud Connector on Windows
Access the documentation needed to install and configure the DCA and Cloud Connector agent in Windows environments
Access the documentation for configuring the DCA and Cloud Connector agent on the Windows operating system below.
6. Installing the DCA and Cloud Connector on Linux
Access the documentation needed to prepare the environment, install, and configure the DCA and Cloud Connector agent on Linux distributions
Access the documentation for configuring the DCA and Cloud Connector agent on the Linux operating system below.
Currently, the Linux agent only supports monitoring meters, supplies, and events for network printers (NDD - Printer Monitor service) and USB printers (NDD - Printer Monitor USB service).
USB printer monitoring (NDD - Printer Monitor USB service) on Linux is compatible with the following models:
|
Ricoh |
IM 430
|
|
HP |
MFP 432 |
|
If you need to approve a new model, open a support ticket so we can analyze its feasibility. |
|
-
Prepare the environment for installation on Linux -
Install the DCA and Cloud Connector agent on Linux (Ubuntu and Ubuntu-based distributions) -
Install the DCA and Cloud Connector agent on Linux (other distributions) -
Change DCA and Cloud Connector agent communication on Linux -
Remove the DCA and Cloud Connector agent on Linux (Ubuntu and Ubuntu-based distributions) -
Remove the DCA and Cloud Connector agent on Linux (other distributions)
7. Start monitoring devices
Network printers
Network printers can be registered on the NDD Orbix portal in two ways:
-
Manually: create the printer and associate it with an agent to start monitoring. For more details, visit Create printer manually.
-
Automatically: follow the steps in this documentation so that printers are automatically identified and registered on the portal.
Instructions
Learn the first steps to start monitoring network printers. It starts with:
-
The installation of the DCA and Cloud Connector agent on the computer or server connected to the devices to be monitored;
-
Enabling and configuring monitoring rules;
-
The configuration of services, determining which printers will be monitored;
-
The printer classification to determine which ones will be managed by the NDD Orbix portal and which will not (optional).
Step 1. Generate the agent installer (Windows)
Who can use this feature
Users with the Administrator or Generate installer permission
The installer is generated directly in the NDD Orbix portal and can be customized according to the organization's needs:
Warning
If the agent is already installed to monitor another device, it is not necessary to reinstall it on the same computer or server.
In this case, go directly to Step 3. Enable and configure monitoring rules and following.
Generate an installer without configured IP addresses: after installation, you will need to define which printers will be monitored
-
Create the customer, as instructed at Create customer, site and department
-
After creating the customer, access the menu Installations > Installers > Generate installer
-
In the Install Network Printer Monitoring option, click Select
-
Click Generate installer
-
In the side tab, select the desired customer
-
Click the Generate installer button
-
Copy the link of the generated installer or click Send by email to send the installer link to the configured emails
When pasted into the browser, the file download will start automatically.-
When you click Send by email, a side tab will open
-
Define the recipients:
-
System emails: select users registered on the NDD Orbix portal;
-
External emails: enter the email address in the field indicated and click Add. Repeat the process until you have included all the desired emails;
-
Both.
-
-
Click the Send installer button to immediately send the installer link to the configured emails
-
The link is valid for 90 days. After this period, you will need to generate a new installer.
Generate an installer with all IP addresses configured (broadcast search): the agent will be installed ready to automatically search for all printers
-
Create the customer, as instructed at Create customer, site and department
-
After creating the customer, access the menu Installations > Installers > Generate installer
-
In the Install Network Printer Monitoring option, click Select
-
Click Customize
-
Select the desired customer
-
Enable the Automatic printer search option
Using the broadcast method, an automatic search for printers will be performed on all IP addresses in the subnets, using the SNMP protocol. -
In the Communicator connection to the cloud field, if Gateway Connector is being used to communicate with NDD Orbix servers, enter the address (IP or hostname) and port of the computer/server where Gateway Connector was installed, in the following format: IP:port
If filled in, the address and port will be predefined in the installer.
Example
192.168.0.1:9635
Information
To install Gateway Connector, access Install the Gateway Connector on Windows.
-
Click the Generate installer button
-
Copy the link of the generated installer or click Send by email to send the installer link to the configured emails
When pasted into the browser, the file download will start automatically.-
When you click Send by email, a side tab will open
-
Define the recipients:
-
System emails: select users registered on the NDD Orbix portal;
-
External emails: enter the email address in the field indicated and click Add. Repeat the process until you have included all the desired emails;
-
Both.
-
-
Click the Send installer button to immediately send the installer link to the configured emails
-
The link is valid for 90 days. After this period, you will need to generate a new installer.
Generate an installer with specific IP addresses configured: the agent will be installed ready to automatically search for the defined printers
-
Create the customer, as instructed at Create customer, site and department
-
After creating the customer, access the menu Installations > Installers > Generate installer
-
In the Install Network Printer Monitoring option, click Select
-
Click Customize
-
Select the desired customer
-
Disable the option Automatic printer search
-
Click the button Configure
-
To configure specific network addresses (supports IPv4 and IPv6):
-
Under Fixed network addresses, click View and edit
-
Click the ✚ button in the upper right corner
-
Under Add manually, enter the specific network address
-
Under Import CSV, upload a CSV file containing the addresses
-
Download the import template under Download template
-
Fill in the CSV file with the addresses
-
Save the CSV file and select or drag it to the portal
The maximum file size allowed is 100kb. -
Click the Add button to add the addresses and remain on the add screen, or click the Add and Close button to add the addresses and return to the registration screen
-
-
-
To configure unicast search addresses (supports IPv4):
-
Under Search for unicast, click View and edit
-
Click the ✚ button in the upper right corner
-
Under Add manually, add the initial and final network addresses
-
In Import CSV, upload a CSV file containing the initial and final addresses
-
Download the import template at Download template
-
Fill in the CSV file with the initial and final addresses
-
Save the CSV file and select or drag it to the portal
The maximum file size allowed is 100kb. -
Click the Add button to add the addresses and remain on the add screen, or click the Add and Close button to add the addresses and return to the registration screen
-
-
-
To configure broadcast search addresses (supports IPv4):
-
In Broadcast addresses, make the Search for printers by broadcast option active
-
To restrict the search to a specific location, click View and edit
If no address is registered, the search will take place on the default subnet. -
Click the ✚ button in the upper right corner
-
In Add manually, add the network address and subnet mask
-
In Import CSV, upload a CSV file containing the addresses and masks
-
Download the import model at Download template
-
Fill in the CSV file with the addresses and masks
-
Save the CSV file and select or drag it to the portal
The maximum file size allowed is 100kb. -
Click the Add button to add the addresses and remain on the add screen, or click the Add and Close button to add the addresses and return to the registration screen
-
-
-
To configure the daily printer search:
-
In Schedule daily printer search, click View and edit
-
Click the ✚ button in the upper right corner
-
Enter the desired time
-
Click the Add button to add the time and remain on the add screen, or click the Add and Close button to add the time and return to the registration screen
-
-
To configure SNMP communication:
-
In Simple Network Management Protocol (SNMP) settings, click the + Add button
-
Enter the SNMP protocol settings
-
Click the Add button to add the SNMP protocol and remain on the add screen, or click the Add and Close button to add the SNMP protocol and return to the registration screen
-
Click the Save button
-
-
Click the Save button
-
In the Communicator connection to the cloud field, if Gateway Connector is being used to communicate with NDD Orbix servers, enter the address (IP or hostname) and port of the computer/server where Gateway Connector was installed, in the following format: IP:port
If filled in, the address and port will be predefined in the installer.
Example
192.168.0.1:9635
Information
To install Gateway Connector, access Install the Gateway Connector on Windows.
-
Click the Generate installer button
-
Copy the link of the generated installer or click Send by email to send the installer link to the configured emails
When pasted into the browser, the file download will start automatically.-
When you click Send by email, a side tab will open
-
Define the recipients:
-
System emails: select users registered on the NDD Orbix portal;
-
External emails: enter the email address in the field indicated and click Add. Repeat the process until you have included all the desired emails;
-
Both.
-
-
Click the Send installer button to immediately send the installer link to the configured emails
-
The link is valid for 90 days. After this period, you will need to generate a new installer.
Step 2. Install the agent in the environment (Windows and Linux)
Install manually on Windows operating system
Warning
If the gateway is used for communication between the agent and the portal, install the Gateway Connector before installing the DCA and Cloud Connector agent.
Note
The installer is customized for each customer and cannot be used for customers other than the one selected at the time of generation.
-
Check the installation prerequisites at Prerequisites for installing the DCA and Cloud Connector agent
-
Access the link generated by the portal to download the installer
-
Run the downloaded file
-
Select the desired language and click Próximo
First, the NDD - Queues Monitor, Microsoft .NET Runtime, Microsoft ASP.NET Core Runtime, and EpsonNet SDK for Windows applications will be installed. If they are already installed, steps 5 through 7 will be skipped, and the installation will proceed from step 8.
-
Click Next on the prerequisite installation welcome screen
-
Click Next to start installing the prerequisites
-
Wait for installation
Once the prerequisites have been installed, the installation of the DCA and Cloud Connector agent will begin.
-
Click Next on the agent installation welcome screen
-
Choose the Installation folder and Work folder and click Next
-
Click Next on the provider and customer information screen.
The fields will be filled in automatically according to the configurations generated in the installer portal. -
Under Additional settings, if desired, select the type of communication (proxy or gateway) and click Next
-
If no option is selected, communication will take place directly between the agent and the portal
-
If Use proxy for communication with NDD Orbix servers is selected, enter the necessary proxy connection settings (address, port and authentication, if any) and click Next
-
If Use Gateway Connector to communicate with NDD Orbix servers option is selected, enter the address (IP or hostname) and port of the computer/server where the Gateway Connector was installed and click Next
If the address and port have been previously configured in the NDD Orbix portal when generating the installer, these fields will already be filled in.
-
-
Click Install
-
Wait for installation and click Finish
Install silently on Windows operating system
Warning
If the gateway is used for communication between the agent and the portal, install the Gateway Connector before installing the DCA and Cloud Connector agent.
Note
The installer is customized for each customer and cannot be used for customers other than the one selected at the time of generation.
-
Check the installation prerequisites at Prerequisites for installing the DCA and Cloud Connector agent
-
Run the downloaded file via Command Prompt
-
Navigate to the directory where the agent executable is located via Command Prompt
-
Enter the name of the executable (NDD - Network printer monitoring.exe or NDD - Local monitoring.exe)
-
Enter the other desired parameters, listed below
-
Example
C:\Downloads\DCA> NDD - Network printer monitoring.exe APPDIR=C:\test WORKFOLDER=C:\test /quiet
DCA and Cloud Connector silent installation parameters
The parameters with "*" are mandatory and must be observed.
The parameters with "**" may become mandatory depending on other parameters used.
Warning
The silent installation of DCA and Cloud Connector must be performed using the parameters documented below. The other options displayed in the installer help (/? or /help) should be disregarded.
APPDIR – Configures the installation directory of DCA and Cloud Connector
-
Setup option: enter the path where you want to install the agent.
-
Requirement: optional.
-
Behavior if not configured: installs in the default directory: C:\Program Files (x86)\NDD TECH\DCA and Cloud Connector.
-
Example: APPDIR=C:\test
WORKFOLDER – Configures the directory of the DCA and Cloud Connector work folder
-
Setup option: enter the path where you want to create the agent's work folder.
-
Requirement: optional.
-
Behavior if not configured: installs in the default directory: C:\NDD TECH\Workfolder.
-
Example: WORKFOLDER=C:\test
ENABLEPROXY – Enables the use of the proxy
-
Setup option: checked = enabled.
-
Requirement: optional (do not use the parameter if you do not want the proxy to be enabled).
-
Behavior if not configured: proxy will not be enabled.
-
Example: ENABLEPROXY=checked
**PROXYADDRESS – Configures the proxy server address
-
Setup option: enter the proxy address.
-
Requirement: mandatory if proxy use is enabled (ENABLEPROXY=checked).
-
Behavior if not configured: proxy will not be configured correctly.
-
Example: PROXYADDRESS=192.168.17.10
**PROXYPORT – Configures the communication port of the proxy server
-
Setup option: enter the proxy port number.
-
Requirement: mandatory if proxy use is enabled (ENABLEPROXY=checked).
-
Behavior if not configured: proxy will not be configured correctly.
-
Example: PROXYPORT=12
ENABLEGATEWAY - Enables the use of the gateway
-
Setup option: checked = enabled.
-
Requirement: optional (do not use the parameter if you do not want the gateway to be enabled).
-
Behavior if not configured: gateway will not be enabled.
-
Example: ENABLEGATEWAY=checked
**GATEWAYADDRESS - Configures the gateway address
-
Setup option: enter the address (IP or hostname) of the computer/server where the Gateway Connector was installed.
-
Requirement: mandatory if gateway use is enabled (ENABLEGATEWAY=checked).
-
Behavior if not configured: gateway will not be configured correctly.
-
Example: GATEWAYADDRESS=192.168.17.10
**GATEWAYPORT - Configures the communication port of the gateway
-
Setup option: enter the gateway port number.
The default gateway port is 9635, but you can enter another one if you wish. -
Requirement: mandatory if gateway use is enabled (ENABLEGATEWAY=checked).
-
Behavior if not configured: gateway will not be configured correctly.
-
Example: GATEWAYPORT=12
Install on Linux operating system
Step 3. Enable and configure monitoring rules (Windows and Linux)
Who can use this feature
Users with the Admin or Managing service rules and Enable or disable general service rule permissions
If the DCA and Cloud Connector agent is installed on Windows using the installer generated in Step 1. Generate the agent installer, the monitoring rules will be enabled and configured automatically, according to the computers or servers where it was installed.
Manual enablement and configuration are only necessary in the following cases:
-
When the agent was already installed to monitor another type of device.
-
When the agent is installed on Linux.
-
Go to Installations > Enable services
-
Locate the Network printer monitoring option
-
Click on the Edit button
-
Enable the service
If you enable it, all the registered rules will be activated.
If you disable it, all the registered rules and the services that monitor network printers (NDD - Printer Monitor) will be deactivated. -
Click the Save button
-
Click on the Configure Rules button
By default, the NDD Orbix portal will have a rule registered for all customers and all computers, but disabled. You therefore need to create specific rules to configure network printer monitoring for the computers you want.
-
Click the ✚ button in the top right corner
-
In the side tab, select the computer you want to enable network printer monitoring on (the agents installed on the selected computer will be monitored)
-
Click the Add button to create the rule and remain on the add screen, or the Add and Close button to create the rule and return to the grid
You can select and add only one computer at a time.
When the rule is created, the services of the agents linked to the computer will be synchronized. The service will then be immediately available for other configurations.
If synchronization fails when the rule is created, select the desired rule in the grid and click the Synchronize button in the top right corner. If there is no synchronization, the service will only be available when the agent is next read.
If a rule is deleted and no new rules are registered for the same computer, device monitoring will stop.
Step 4. Configure the service (Windows and Linux)
Service configuration is only necessary in the following cases:
-
When the Windows installer was generated without previously configured IP addresses.
-
When the agent is installed on Linux.
In both scenarios, access the documentation below to define which printers will be monitored:
-
Filter network printer monitoring by manufacturer and model (optional configuration): to configure the monitoring filter by manufacturer and model.
-
Configure addresses for searching network printers for the service (mandatory configuration): to configure the addresses for searching for printers.
-
Configure network printer search for the service (optional configuration): to configure the scheduled search for printers or start the search immediately.
-
Configure network printer service synchronization (optional configuration): to configure service synchronization.
-
Configure network printer service monitoring (optional configuration): to configure the printer service monitoring.
-
Configure network printer service communication (optional configuration): to configure service communication.
Step 5. Classify the printers to be managed (Windows and Linux)
Who can use this feature
Users with the Administrator or Manage new devices permission
After completing the previous steps, all network printers identified by the agent will be automatically registered in the portal. From that point on, the system will begin collecting registration data, meter readings, supplies, and events.
Newly identified printers remain available in the Devices > New devices menu for up to 15 days. If no action is taken within this period, the printer will be automatically classified as managed.
For this reason, manual classification of printers is an optional configuration. It allows the provider to evaluate newly identified printers and define which devices will be managed or unmanaged by the NDD Orbix portal before they are automatically classified as managed after the 15-day period.
Whenever the agent identifies new printers on the network, they will be made available in the Devices > New devices menu for classification. At that point, the 15-day period will begin. The entry date can be found in the corresponding column of the grid.
If you want to classify the devices manually before automatic classification, follow the steps below:
-
Go to the Devices > New devices menu
-
Select the desired devices
-
To access the device properties, click on its name
-
-
Click the Manage or Not manage button
Depending on the classification performed:
-
Managed printers will be moved to the Devices > Inventory and Monitoring > Printers menus.
-
Unmanaged printers will be moved to the Devices > Unmanaged menu.
In both cases, you can view the device’s entry date in the grid of the respective menu.
Warning
Moving a printer between customers does not cause it to be considered a new device. However, when a printer is moved between providers, it is processed as a new device and will become available again in the Devices > New devices menu for classification.
As long as the printer remains in the Devices > New devices menu, it will not be considered for provider billing purposes. However, the collection of registration data, meter readings, supplies, and events will continue as usual.
Information
The initial classification defines the device’s status after it is identified, but the management status can be changed later, as instructed at Stop managing or return to managing printers.
To view the inventory of managed printers, access View printer inventory.
USB printers
USB printers can be registered on the NDD Orbix portal in two ways:
-
Manually: create the printer and associate it with an agent to start monitoring. For more details, visit Create printer manually.
-
Automatically: follow the steps in this documentation so that printers are automatically identified and registered on the portal.
Instructions
Learn the first steps to start monitoring USB printers. It starts with:
-
The installation of the DCA and Cloud Connector agent on the computer or server connected to the device to be monitored;
-
Enabling and configuring the monitoring rules;
-
The configuration of the service (optional);
-
The printer classification to determine which ones will be managed by the NDD Orbix portal and which will not (optional).
Step 1. Generate the agent installer (Windows)
Who can use this feature
Users with the Admin or Generate installer permissions
The installer is generated directly in the NDD Orbix portal and can be customized according to the organization's needs:
Warning
If the agent is already installed to monitor another device, it is not necessary to reinstall it on the same computer or server.
In this case, go directly to Step 3. Enable and configure monitoring rules and following.
Generate an installer with direct or proxy communication
-
Create the customer, as instructed at Create customer, site and department
-
After creating the customer, access the menu Installations > Installers > Generate installer
-
In the Install Local Monitoring option, click Select
-
Click Generate installer
-
In the side tab, select the desired customer
-
Click the Generate installer button
-
Copy the link of the generated installer or click Send by email to send the installer link to the configured emails
When pasted into the browser, the file download will start automatically.-
When you click Send by email, a side tab will open
-
Define the recipients:
-
System emails: select users registered on the NDD Orbix portal;
-
External emails: enter the email address in the field indicated and click Add. Repeat the process until you have included all the desired emails;
-
Both.
-
-
Click the Send installer button to immediately send the installer link to the configured emails
-
The link is valid for 90 days. After this period, you will need to generate a new installer.
Generate an installer with gateway communication
-
Create the customer, as instructed at Create customer, site and department
-
After creating the customer, access the menu Installations > Installers > Generate installer
-
In the Install Local Monitoring option, click Select
-
Click Customize
-
Select the desired customer
-
In the Communicator connection to the cloud field, if Gateway Connector is being used to communicate with NDD Orbix servers, enter the address (IP or hostname) and port of the computer/server where Gateway Connector was installed, in the following format: IP:port
If filled in, the address and port will be predefined in the installer.
Example
192.168.0.1:9635
Information
To install Gateway Connector, access Install the Gateway Connector on Windows.
-
Click the Generate installer button
-
Copy the link of the generated installer or click Send by email to send the installer link to the configured emails
When pasted into the browser, the file download will start automatically.-
When you click Send by email, a side tab will open
-
Define the recipients:
-
System emails: select users registered on the NDD Orbix portal;
-
External emails: enter the email address in the field indicated and click Add. Repeat the process until you have included all the desired emails;
-
Both.
-
-
Click the Send installer button to immediately send the installer link to the configured emails
-
The link is valid for 90 days. After this period, you will need to generate a new installer.
Step 2. Install the agent in the environment (Windows and Linux)
Install manually on Windows operating system
Warning
If the gateway is used for communication between the agent and the portal, install the Gateway Connector before installing the DCA and Cloud Connector agent.
Note
The installer is customized for each customer and cannot be used for customers other than the one selected at the time of generation.
-
Check the installation prerequisites at Prerequisites for installing the DCA and Cloud Connector agent
-
Access the link generated by the portal to download the installer
-
Run the downloaded file
-
Select the desired language and click Próximo
First, the NDD - Queues Monitor, Microsoft .NET Runtime, Microsoft ASP.NET Core Runtime, and EpsonNet SDK for Windows applications will be installed. If they are already installed, steps 5 through 7 will be skipped, and the installation will proceed from step 8.
-
Click Next on the prerequisite installation welcome screen
-
Click Next to start installing the prerequisites
-
Wait for installation
Once the prerequisites have been installed, the installation of the DCA and Cloud Connector agent will begin.
-
Click Next on the agent installation welcome screen
-
Choose the Installation folder and Work folder and click Next
-
Click Next on the provider and customer information screen.
The fields will be filled in automatically according to the configurations generated in the installer portal. -
Under Additional settings, if desired, select the type of communication (proxy or gateway) and click Next
-
If no option is selected, communication will take place directly between the agent and the portal
-
If Use proxy for communication with NDD Orbix servers is selected, enter the necessary proxy connection settings (address, port and authentication, if any) and click Next
-
If Use Gateway Connector to communicate with NDD Orbix servers option is selected, enter the address (IP or hostname) and port of the computer/server where the Gateway Connector was installed and click Next
If the address and port have been previously configured in the NDD Orbix portal when generating the installer, these fields will already be filled in.
-
-
Click Install
-
Wait for installation and click Finish
Install silently on Windows operating system
Warning
If the gateway is used for communication between the agent and the portal, install the Gateway Connector before installing the DCA and Cloud Connector agent.
Note
The installer is customized for each customer and cannot be used for customers other than the one selected at the time of generation.
-
Check the installation prerequisites at Prerequisites for installing the DCA and Cloud Connector agent
-
Run the downloaded file via Command Prompt
-
Navigate to the directory where the agent executable is located via Command Prompt
-
Enter the name of the executable (NDD - Network printer monitoring.exe or NDD - Local monitoring.exe)
-
Enter the other desired parameters, listed below
-
Example
C:\Downloads\DCA> NDD - Network printer monitoring.exe APPDIR=C:\test WORKFOLDER=C:\test /quiet
DCA and Cloud Connector silent installation parameters
The parameters with "*" are mandatory and must be observed.
The parameters with "**" may become mandatory depending on other parameters used.
Warning
The silent installation of DCA and Cloud Connector must be performed using the parameters documented below. The other options displayed in the installer help (/? or /help) should be disregarded.
APPDIR – Configures the installation directory of DCA and Cloud Connector
-
Setup option: enter the path where you want to install the agent.
-
Requirement: optional.
-
Behavior if not configured: installs in the default directory: C:\Program Files (x86)\NDD TECH\DCA and Cloud Connector.
-
Example: APPDIR=C:\test
WORKFOLDER – Configures the directory of the DCA and Cloud Connector work folder
-
Setup option: enter the path where you want to create the agent's work folder.
-
Requirement: optional.
-
Behavior if not configured: installs in the default directory: C:\NDD TECH\Workfolder.
-
Example: WORKFOLDER=C:\test
ENABLEPROXY – Enables the use of the proxy
-
Setup option: checked = enabled.
-
Requirement: optional (do not use the parameter if you do not want the proxy to be enabled).
-
Behavior if not configured: proxy will not be enabled.
-
Example: ENABLEPROXY=checked
**PROXYADDRESS – Configures the proxy server address
-
Setup option: enter the proxy address.
-
Requirement: mandatory if proxy use is enabled (ENABLEPROXY=checked).
-
Behavior if not configured: proxy will not be configured correctly.
-
Example: PROXYADDRESS=192.168.17.10
**PROXYPORT – Configures the communication port of the proxy server
-
Setup option: enter the proxy port number.
-
Requirement: mandatory if proxy use is enabled (ENABLEPROXY=checked).
-
Behavior if not configured: proxy will not be configured correctly.
-
Example: PROXYPORT=12
ENABLEGATEWAY - Enables the use of the gateway
-
Setup option: checked = enabled.
-
Requirement: optional (do not use the parameter if you do not want the gateway to be enabled).
-
Behavior if not configured: gateway will not be enabled.
-
Example: ENABLEGATEWAY=checked
**GATEWAYADDRESS - Configures the gateway address
-
Setup option: enter the address (IP or hostname) of the computer/server where the Gateway Connector was installed.
-
Requirement: mandatory if gateway use is enabled (ENABLEGATEWAY=checked).
-
Behavior if not configured: gateway will not be configured correctly.
-
Example: GATEWAYADDRESS=192.168.17.10
**GATEWAYPORT - Configures the communication port of the gateway
-
Setup option: enter the gateway port number.
The default gateway port is 9635, but you can enter another one if you wish. -
Requirement: mandatory if gateway use is enabled (ENABLEGATEWAY=checked).
-
Behavior if not configured: gateway will not be configured correctly.
-
Example: GATEWAYPORT=12
Install on Linux operating system
Step 3. Enable and configure monitoring rules (Windows and Linux)
Who can use this feature
Users with the Admin or Managing service rules and Enable or disable general service rule permissions
When installing the agent, no services will be enabled. The next step is to enable the service in the NDD Orbix portal according to your needs, so that the agent takes over the service and performs device monitoring.
-
Go to Installations > Enable services
-
Locate the USB printer monitoring option
-
Click on the Edit button
-
Enable the service
If you enable it, all the registered rules will be activated.
If you disable it, all the registered rules and the services that monitor USB printers (NDD - Printer Monitor USB) will be deactivated. -
Click the Save button
-
Click on the Configure Rules button
By default, the NDD Orbix portal will have a rule registered for all customers and all computers, but disabled. You therefore need to create specific rules to configure USB printer monitoring for the desired customers/computers.
Create rule by customer
The agents installed on all the computers allocated to the selected customers will be monitored.
-
Click the Create > Create rule by customer button
-
Check All if you want the rule to apply to all customers (agents installed on all computers allocated to all customers will be monitored) or Specific client(s) if you want to add which customers the rule will apply to (all computers of the selected customers will be monitored)
-
If the Specific client(s) option is chosen, click the + Add button
-
Select the customers you want to add to the rule
-
Click the Add button to add and remain on the add screen or the Add and Close button to add and return to the page
-
-
Enable or disable the rule
If you enable and save the rule, it will be active for the selected customers.
If you disable and save the rule, it will be registered but not active.
To change the rule's status, you must register it again with the desired status. -
Click the Save button to create the rule
If a rule is deleted and no new rule is registered for the same customer or computer, device monitoring will be interrupted.
Create rule by computers
The agents installed on all the computers allocated to the selected customers will be monitored.
-
Click the Create > Create rule by customer button
-
Check All if you want the rule to apply to all customers (agents installed on all computers allocated to all customers will be monitored) or Specific client(s) if you want to add which customers the rule will apply to (all computers of the selected customers will be monitored)
-
If the Specific client(s) option is chosen, click the + Add button
-
Select the customers you want to add to the rule
-
Click the Add button to add and remain on the add screen or the Add and Close button to add and return to the page
-
-
Enable or disable the rule
If you enable and save the rule, it will be active for the selected customers.
If you disable and save the rule, it will be registered but not active.
To change the rule's status, you must register it again with the desired status. -
Click the Save button to create the rule
If a rule is deleted and no new rule is registered for the same customer or computer, device monitoring will be interrupted.
Step 4. Configure the service (Windows and Linux)
Access the documentation below to configure the service, if you want:
-
Filter USB printer monitoring by manufacturer and model (optional configuration): to configure the monitoring filter by manufacturer and model.
-
Configure USB printer search for the service (optional configuration): to start searching for the USB printer immediately.
-
Configure USB printer service synchronization (optional configuration): to configure service synchronization.
-
Configure USB printer service monitoring (optional configuration): to configure service monitoring.
Step 5. Classify the printers to be managed (Windows and Linux)
Who can use this feature
Users with the Administrator or Manage new devices permission
After completing the previous steps, all USB printers identified by the agent will be automatically registered in the portal. From that point on, the system will begin collecting registration data, meter readings, supplies, and events.
Newly identified printers remain available in the Devices > New devices menu for up to 15 days. If no action is taken within this period, the printer will be automatically classified as managed.
For this reason, manual classification of printers is an optional configuration. It allows the provider to evaluate newly identified printers and define which devices will be managed or unmanaged by the NDD Orbix portal before they are automatically classified as managed after the 15-day period.
Whenever the agent identifies new connected printers, they will be made available in the Devices > New devices menu for classification. At that point, the 15-day period will begin. The entry date can be found in the corresponding column of the grid.
If you want to classify the devices manually before automatic classification, follow the steps below:
-
Go to the Devices > New devices menu
-
Select the desired devices
-
To access the device properties, click on its name
-
-
Click the Manage or Not manage button
Depending on the classification performed:
-
Managed printers will be moved to the Devices > Inventory and Monitoring > Printers menus.
-
Unmanaged printers will be moved to the Devices > Unmanaged menu.
In both cases, you can view the device’s entry date in the grid of the respective menu.
Warning
Moving a printer between customers does not cause it to be considered a new device. However, when a printer is moved between providers, it is processed as a new device and will become available again in the Devices > New devices menu for classification.
As long as the printer remains in the Devices > New devices menu, it will not be considered for provider billing purposes. However, the collection of registration data, meter readings, supplies, and events will continue as usual.
Information
The initial classification defines the device’s status after it is identified, but the management status can be changed later, as instructed at Stop managing or return to managing printers.
To view the inventory of managed printers, access View printer inventory.
Print queues
Remote administration of queues and drivers begins with:
-
The installation of the DCA and Cloud Connector agent on all computers that will use or may use the print queues;
-
The enabling and configuration of monitoring rules;
-
The configuration of the SNMP protocol for network printers (if necessary, if the default settings do not meet requirements);
-
The configuration of the drivers and print queues.
Instructions
Follow the steps below to start remote administration of queues and drivers:
Step 1. Generate the agent installer
Who can use this feature
Users with the Admin or Generate installer permissions
The installer is generated directly in the NDD Orbix portal and can be customized according to the organization's needs:
Warning
If the agent is already installed to monitor another device, it is not necessary to reinstall it on the same computer.
In this case, go directly to Step 3. Enable and configure monitoring rules and following.
Generate an installer with direct or proxy communication
-
Create the customer, as instructed at Create customer, site and department
-
After creating the customer, access the menu Installations > Installers > Generate installer
-
In the Install Local Monitoring option, click Select
-
Click Generate installer
-
In the side tab, select the desired customer
-
Click the Generate installer button
-
Copy the link of the generated installer or click Send by email to send the installer link to the configured emails
When pasted into the browser, the file download will start automatically.-
When you click Send by email, a side tab will open
-
Define the recipients:
-
System emails: select users registered on the NDD Orbix portal;
-
External emails: enter the email address in the field indicated and click Add. Repeat the process until you have included all the desired emails;
-
Both.
-
-
Click the Send installer button to immediately send the installer link to the configured emails
-
The link is valid for 90 days. After this period, you will need to generate a new installer.
Generate an installer with gateway communication
-
Create the customer, as instructed at Create customer, site and department
-
After creating the customer, access the menu Installations > Installers > Generate installer
-
In the Install Local Monitoring option, click Select
-
Click Customize
-
Select the desired customer
-
In the Communicator connection to the cloud field, if Gateway Connector is being used to communicate with NDD Orbix servers, enter the address (IP or hostname) and port of the computer/server where Gateway Connector was installed, in the following format: IP:port
If filled in, the address and port will be predefined in the installer.
Example
192.168.0.1:9635
Information
To install Gateway Connector, access Install the Gateway Connector on Windows.
-
Click the Generate installer button
-
Copy the link of the generated installer or click Send by email to send the installer link to the configured emails
When pasted into the browser, the file download will start automatically.-
When you click Send by email, a side tab will open
-
Define the recipients:
-
System emails: select users registered on the NDD Orbix portal;
-
External emails: enter the email address in the field indicated and click Add. Repeat the process until you have included all the desired emails;
-
Both.
-
-
Click the Send installer button to immediately send the installer link to the configured emails
-
The link is valid for 90 days. After this period, you will need to generate a new installer.
Step 2. Install the agent in the environment
Currently, the installation of DCA and Cloud Connector for remote queue and driver administration is only available for Windows operating systems.
Install manually on Windows operating system
Warning
If the gateway is used for communication between the agent and the portal, install the Gateway Connector before installing the DCA and Cloud Connector agent.
Note
The installer is customized for each customer and cannot be used for customers other than the one selected at the time of generation.
-
Check the installation prerequisites at Prerequisites for installing the DCA and Cloud Connector agent
-
Access the link generated by the portal to download the installer
-
Run the downloaded file
-
Select the desired language and click Próximo
First, the NDD - Queues Monitor, Microsoft .NET Runtime, Microsoft ASP.NET Core Runtime, and EpsonNet SDK for Windows applications will be installed. If they are already installed, steps 5 through 7 will be skipped, and the installation will proceed from step 8.
-
Click Next on the prerequisite installation welcome screen
-
Click Next to start installing the prerequisites
-
Wait for installation
Once the prerequisites have been installed, the installation of the DCA and Cloud Connector agent will begin.
-
Click Next on the agent installation welcome screen
-
Choose the Installation folder and Work folder and click Next
-
Click Next on the provider and customer information screen.
The fields will be filled in automatically according to the configurations generated in the installer portal. -
Under Additional settings, if desired, select the type of communication (proxy or gateway) and click Next
-
If no option is selected, communication will take place directly between the agent and the portal
-
If Use proxy for communication with NDD Orbix servers is selected, enter the necessary proxy connection settings (address, port and authentication, if any) and click Next
-
If Use Gateway Connector to communicate with NDD Orbix servers option is selected, enter the address (IP or hostname) and port of the computer/server where the Gateway Connector was installed and click Next
If the address and port have been previously configured in the NDD Orbix portal when generating the installer, these fields will already be filled in.
-
-
Click Install
-
Wait for installation and click Finish
Install silently on Windows operating system
Warning
If the gateway is used for communication between the agent and the portal, install the Gateway Connector before installing the DCA and Cloud Connector agent.
Note
The installer is customized for each customer and cannot be used for customers other than the one selected at the time of generation.
-
Check the installation prerequisites at Prerequisites for installing the DCA and Cloud Connector agent
-
Run the downloaded file via Command Prompt
-
Navigate to the directory where the agent executable is located via Command Prompt
-
Enter the name of the executable (NDD - Network printer monitoring.exe or NDD - Local monitoring.exe)
-
Enter the other desired parameters, listed below
-
Example
C:\Downloads\DCA> NDD - Network printer monitoring.exe APPDIR=C:\test WORKFOLDER=C:\test /quiet
DCA and Cloud Connector silent installation parameters
The parameters with "*" are mandatory and must be observed.
The parameters with "**" may become mandatory depending on other parameters used.
Warning
The silent installation of DCA and Cloud Connector must be performed using the parameters documented below. The other options displayed in the installer help (/? or /help) should be disregarded.
APPDIR – Configures the installation directory of DCA and Cloud Connector
-
Setup option: enter the path where you want to install the agent.
-
Requirement: optional.
-
Behavior if not configured: installs in the default directory: C:\Program Files (x86)\NDD TECH\DCA and Cloud Connector.
-
Example: APPDIR=C:\test
WORKFOLDER – Configures the directory of the DCA and Cloud Connector work folder
-
Setup option: enter the path where you want to create the agent's work folder.
-
Requirement: optional.
-
Behavior if not configured: installs in the default directory: C:\NDD TECH\Workfolder.
-
Example: WORKFOLDER=C:\test
ENABLEPROXY – Enables the use of the proxy
-
Setup option: checked = enabled.
-
Requirement: optional (do not use the parameter if you do not want the proxy to be enabled).
-
Behavior if not configured: proxy will not be enabled.
-
Example: ENABLEPROXY=checked
**PROXYADDRESS – Configures the proxy server address
-
Setup option: enter the proxy address.
-
Requirement: mandatory if proxy use is enabled (ENABLEPROXY=checked).
-
Behavior if not configured: proxy will not be configured correctly.
-
Example: PROXYADDRESS=192.168.17.10
**PROXYPORT – Configures the communication port of the proxy server
-
Setup option: enter the proxy port number.
-
Requirement: mandatory if proxy use is enabled (ENABLEPROXY=checked).
-
Behavior if not configured: proxy will not be configured correctly.
-
Example: PROXYPORT=12
ENABLEGATEWAY - Enables the use of the gateway
-
Setup option: checked = enabled.
-
Requirement: optional (do not use the parameter if you do not want the gateway to be enabled).
-
Behavior if not configured: gateway will not be enabled.
-
Example: ENABLEGATEWAY=checked
**GATEWAYADDRESS - Configures the gateway address
-
Setup option: enter the address (IP or hostname) of the computer/server where the Gateway Connector was installed.
-
Requirement: mandatory if gateway use is enabled (ENABLEGATEWAY=checked).
-
Behavior if not configured: gateway will not be configured correctly.
-
Example: GATEWAYADDRESS=192.168.17.10
**GATEWAYPORT - Configures the communication port of the gateway
-
Setup option: enter the gateway port number.
The default gateway port is 9635, but you can enter another one if you wish. -
Requirement: mandatory if gateway use is enabled (ENABLEGATEWAY=checked).
-
Behavior if not configured: gateway will not be configured correctly.
-
Example: GATEWAYPORT=12
Step 3. Enable and configure monitoring rules
Who can use this feature
Users with the Admin or Managing service rules and Enable or disable general service rule permissions
When you install the agent, no services will be enabled. The next step is to enable the service in the NDD Orbix portal according to your needs, so that the agent takes over the service and performs monitoring of the devices.
-
Go to Installations > Enable services
-
Locate the Print queues option
-
Click on the Edit button
-
Enable the service
If you enable the print queues service, all registered rules will be activated.
If you disable the print queue service, all registered rules and print queue services (NDD - Print Queue) will be deactivated. The print queues will remain registered on the NDD Orbix portal, but they will be uninstalled from the computers and will display the status Pending installation. -
Click the Save button
-
Click on the Configure Rules button
By default, the NDD Orbix portal will have a rule registered for all customers, but disabled. It is therefore necessary to create specific rules to configure print queue management for the desired customers.
-
Click the ✚ button in the top right corner
-
In the side tab, select the customers you want the print queue service to be enabled for (the agents installed on the selected customers will be monitored)
-
Click the Add button to create the rule and remain on the add screen, or the Add and Close button to create the rule and return to the grid
If a rule is deleted and no new rule is registered for the same customer, that customer’s print queues will remain registered on the NDD Orbix portal, but they will be uninstalled from the computers and will display the status Pending installation.
Step 4. Configure the SNMP protocol for network printers in the remote administration feature for queues and drivers
Configuring SNMP protocol for TCP/IP print queues is necessary so that printers can be identified when queues are created.
Note
The registered SNMP protocol settings will be applied to printers in the remote administration of queues and drivers, and EcoPrint.
In the SNMP connection, when using v1/v2 or v3, you can configure a time interval (in milliseconds) between each SNMP call made to the printer.
By default, the NDD Orbix portal will have an SNMP protocol registered for all customers, with the following settings:
-
Customer: All
-
SNMP entry name: Default
-
Answer time (ms): 3,000
-
Number of attempts: 3
-
Reading community: public
-
Protocol: v1/v2
Review the default configuration to identify whether it will meet your needs. It cannot be deleted.
If necessary, create specific configurations for customers who have different SNMP parameters than the default, as instructed below, considering that the specific configurations will take precedence over the default configuration.
Always keep SNMP connections up to date.
Information
The interval at which the agent searches for printers will depend on the answer time and the number of attempts configured in the protocol. Thus, each search can be a minimum of 5 minutes and a maximum of 30 minutes, depending on the configuration. However, if there is an error during the printer search, this time can be extended.
Who can use this feature
Users with the Admin or Administration of SNMP settings permission
-
Go to Settings > SNMP protocol
-
Click on the button ✚ in the top right corner
-
Select the customer that will be linked to this protocol configuration
-
Enter the other protocol settings
-
Click the Save button
More than one SNMP protocol can be created per customer, as long as these settings contain different SNMP entry names.
Step 5. Configure the drivers and print queues
Access the documentation below to configure the drivers and print queues:
-
Create print queue driver (mandatory configuration): to link to print queues.
-
Create print queue computer (mandatory configuration): to install print queues on computers and/or computer groupings.
-
Create print queue user (optional configuration): to install print queues on users and/or user groups, or link user information to the print queue installed on computers and/or computer groups.
-
Create print queue grouping (optional configuration): to group members (computers or users) to facilitate mass installation of print queues.
-
Remove print queues that were not created by the portal (optional configuration): to remove print queues that were not created by the portal itself.
-
Create print queue (mandatory configuration): to create print queues.
-
Install print queue on computers and users (mandatory configuration): to install the print queue created on computers, users, and/or groupings.
EcoPrint
EcoPrint management begins with:
-
The configuration of printer monitoring;
-
The enabling and configuration of monitoring rules;
-
The use of a compatible driver (PCL6) in the print queues of printers covered by the saving rules;
-
The configuration of the SNMP protocol for network printers (if the default settings do not meet requirements);
-
The configuration of remote administration of queues and drivers (if queues are members of the saving rules);
-
The creation of saving rules.
Instructions
Follow the steps below to start EcoPrint management:
Step 1. Configure printer monitoring
EcoPrint requires printer monitoring to be configured in advance in all cases.
For network printers, access Start monitoring network printers. For USB printers, access Start monitoring USB printers.
Warning
The agent must be installed on the device where the print spool is generated. If you use a print server, install the agent on that server. Otherwise, install the agent on each computer where the printers are connected and EcoPrint will be applied.
Step 2. Enable and configure monitoring rules
Who can use this feature
Users with the Admin or Managing service rules and Enable or disable general service rule permissions
When you install the agent, no EcoPrint services will be enabled. The next step is to enable the service in the NDD Orbix portal according to your needs, so that the agent takes over the service and monitors the devices.
-
Go to Installations > Enable services
-
Locate the EcoPrint option
-
Click on the Edit button
-
Enable the service
If you enable it, all the registered rules will be activated.
If you disable it, all the registered rules and the EcoPrint services (NDD - Supply Watch) will be deactivated. -
Click the Save button
-
Click on the Configure Rules button
By default, the NDD Orbix portal will have a rule registered for all customers, but disabled. It is therefore necessary to create specific rules to configure EcoPrint management for the desired customers.
-
Click the ✚ button in the top right corner
-
In the side tab, select the customers you want the EcoPrint service to be enabled for (the agents installed on the selected customers will be monitored)
-
Click the Add button to create the rule and remain on the add screen, or the Add and Close button to create the rule and return to the grid
Warning
In environments that have version 5.29.2 or earlier of NDD Print Agent installed, when enabling and registering the EcoPrint service rule in the NDD Orbix portal in these environments, all print queues for printers monitored jointly by NDD Print Agent and EcoPrint from DCA and Cloud Connector may be paused. In such cases, the queues must be manually unpaused, as instructed below:
-
In Windows, open the printer's print queue
-
In the queue window, click on the Printer tab
-
Uncheck the Pause Printing option
A new version of NDD Print Agent, currently in the Release Candidate phase, will be released soon to correct this situation. The availability of the update will be communicated in the NDD Print Help Center.
If a rule is deleted and no new rules are registered for the same customer, device monitoring will stop.
Step 3. Use the compatible driver
Verify that all print queues for printers associated with saving rules (standard or customized) use a driver with PCL6 language.
To ensure the solution functions correctly, NDD Orbix components automatically monitor and adjust certain configurations in the print queues.
The NDD - Queues Monitor component automatically monitors and configures the following parameters:
-
Advanced tab in the driver properties:
-
Start printing after last page is spooled: enabled.
-
Print spooled documents first: enabled.
-
Keep printed documents: disabled.
-
-
Sharing tab in the driver properties (for shared queues only):
-
Render print jobs on client computers: disabled.
-
Warning
The settings apply to all print queues on the computer, including those not linked to EcoPrint or NDD Orbix (printers not registered with or monitored by the platform).
The NDD - Supply Watch service automatically monitors and configures the following parameter:
-
Advanced tab in the driver properties:
-
Enable advanced printing features: disabled. If this option remains enabled, the driver language may change during printing, preventing the savings from taking effect.
-
Warning
This configuration applies to all print queues associated with monitored and managed printers by NDD Orbix.
If the error log indicates that the language used is not PCL6, even with the correct driver, see PCL6 driver language error, even with the correct driver installed for correction instructions.
Step 4. Configure the SNMP protocol for network printers in the EcoPrint feature
Configuring SNMP protocol for network printers and TCP/IP print queues is necessary for the NDD - Supply Watch service to identify the devices managed by the NDD Orbix portal and apply supply saving.
In rules where the members are network printers, in addition to configuring the SNMP protocol in the service of each managed printer (as instructed in Configure network printer service communication), it is necessary to configure the SNMP protocol of the printers covered by the EcoPrint rules (as instructed in this documentation).
Note
The registered SNMP protocol settings will be applied to printers in the remote administration of queues and drivers, and EcoPrint.
In the SNMP connection, when using v1/v2 or v3, you can configure a time interval (in milliseconds) between each SNMP call made to the printer.
By default, the NDD Orbix portal will have an SNMP protocol registered for all customers, with the following settings:
-
Customer: All
-
SNMP entry name: Default
-
Response time (ms): 3,000
-
Number of attempts: 3
-
Reading community: public
-
Protocol: v1/v2
Review the default configuration to identify whether it will meet your needs. It cannot be deleted.
If necessary, create specific configurations for customers who have different SNMP parameters than the default, considering that the specific configurations will take precedence over the default configuration.
Always keep SNMP connections up to date.
Information
The interval at which the agent searches for printers will depend on the answer time and the number of attempts configured in the protocol. Thus, each search can be a minimum of 5 minutes and a maximum of 30 minutes, depending on the configuration. However, if there is an error during the printer search, this time can be extended.
Who can use this feature
Users with the Admin or Administration of SNMP settings permission
-
Go to Settings > SNMP protocol
-
Click on the button ✚ in the top right corner
-
Select the customer that will be linked to this protocol configuration
-
Enter the other protocol settings
-
Click the Save button
More than one SNMP protocol can be created per customer, as long as the settings contain different SNMP entry names.
Step 5. Configure remote queue and driver administration
If print queues are used as members of saving rules, you must configure remote queue and driver administration as instructed in Start remote administration of queues and drivers.
Step 6. Create saving rules
Saving rules allow you to define and customize print saving levels according to each customer's needs. To create rules, access Create EcoPrint saving rule.
EcoPrint synchronizes with the printers to recognize them and enable the application of saving rules to print jobs. This synchronization occurs when EcoPrint starts, every 5 minutes, and whenever a print queue is created or modified.
For synchronization to complete, the printer must be turned on. If it is turned off during an attempt, EcoPrint will perform a new synchronization during the next 5-minute cycle or when there is a new change to the print queue. Saving rules will be applied to print jobs only after this synchronization is complete.
Network thermal printers
Network thermal printers are identified and registered automatically on the portal after completing the configuration steps described in this documentation.
It is not possible to register thermal printers manually.
Instructions
Learn the first steps to start monitoring network thermal printers. It starts with:
-
The installation of the DCA and Cloud Connector agent on the computer or server connected to the devices to be monitored;
-
Enabling and configuring monitoring rules;
-
The configuration of services, determining which thermal printers will be monitored;
-
The thermal printer classification to determine which ones will be managed by the NDD Orbix portal and which will not (optional).
Step 1. Generate the agent installer
Who can use this feature
Users with the Admin or Generate installer permissions
The installer is generated directly in the NDD Orbix portal and can be customized according to the organization's needs:
Warning
If the agent is already installed to monitor another device, it is not necessary to reinstall it on the same computer or server.
In this case, go directly to Step 3. Enable and configure monitoring rules and following.
Generate an installer with direct or proxy communication
-
Create the customer, as instructed at Create customer, site and department
-
After creating the customer, access the menu Installations > Installers > Generate installer
-
In the Install Local Monitoring option, click Select
-
Click Generate installer
-
In the side tab, select the desired customer
-
Click the Generate installer button
-
Copy the link of the generated installer or click Send by email to send the installer link to the configured emails
When pasted into the browser, the file download will start automatically.-
When you click Send by email, a side tab will open
-
Define the recipients:
-
System emails: select users registered on the NDD Orbix portal;
-
External emails: enter the email address in the field indicated and click Add. Repeat the process until you have included all the desired emails;
-
Both.
-
-
Click the Send installer button to immediately send the installer link to the configured emails
-
The link is valid for 90 days. After this period, you will need to generate a new installer.
Generate an installer with gateway communication
-
Create the customer, as instructed at Create customer, site and department
-
After creating the customer, access the menu Installations > Installers > Generate installer
-
In the Install Local Monitoring option, click Select
-
Click Customize
-
Select the desired customer
-
In the Communicator connection to the cloud field, if Gateway Connector is being used to communicate with NDD Orbix servers, enter the address (IP or hostname) and port of the computer/server where Gateway Connector was installed, in the following format: IP:port
If filled in, the address and port will be predefined in the installer.
Example
192.168.0.1:9635
Information
To install Gateway Connector, access Install the Gateway Connector on Windows.
-
Click the Generate installer button
-
Copy the link of the generated installer or click Send by email to send the installer link to the configured emails
When pasted into the browser, the file download will start automatically.-
When you click Send by email, a side tab will open
-
Define the recipients:
-
System emails: select users registered on the NDD Orbix portal;
-
External emails: enter the email address in the field indicated and click Add. Repeat the process until you have included all the desired emails;
-
Both.
-
-
Click the Send installer button to immediately send the installer link to the configured emails
-
The link is valid for 90 days. After this period, you will need to generate a new installer.
Step 2. Install the agent in the environment
Currently, the installation of DCA and Cloud Connector for monitoring network thermal printers is only available for Windows operating systems.
Install manually on Windows operating system
Warning
If the gateway is used for communication between the agent and the portal, install the Gateway Connector before installing the DCA and Cloud Connector agent.
Note
The installer is customized for each customer and cannot be used for customers other than the one selected at the time of generation.
-
Check the installation prerequisites at Prerequisites for installing the DCA and Cloud Connector agent
-
Access the link generated by the portal to download the installer
-
Run the downloaded file
-
Select the desired language and click Próximo
First, the NDD - Queues Monitor, Microsoft .NET Runtime, Microsoft ASP.NET Core Runtime, and EpsonNet SDK for Windows applications will be installed. If they are already installed, steps 5 through 7 will be skipped, and the installation will proceed from step 8.
-
Click Next on the prerequisite installation welcome screen
-
Click Next to start installing the prerequisites
-
Wait for installation
Once the prerequisites have been installed, the installation of the DCA and Cloud Connector agent will begin.
-
Click Next on the agent installation welcome screen
-
Choose the Installation folder and Work folder and click Next
-
Click Next on the provider and customer information screen.
The fields will be filled in automatically according to the configurations generated in the installer portal. -
Under Additional settings, if desired, select the type of communication (proxy or gateway) and click Next
-
If no option is selected, communication will take place directly between the agent and the portal
-
If Use proxy for communication with NDD Orbix servers is selected, enter the necessary proxy connection settings (address, port and authentication, if any) and click Next
-
If Use Gateway Connector to communicate with NDD Orbix servers option is selected, enter the address (IP or hostname) and port of the computer/server where the Gateway Connector was installed and click Next
If the address and port have been previously configured in the NDD Orbix portal when generating the installer, these fields will already be filled in.
-
-
Click Install
-
Wait for installation and click Finish
Install silently on Windows operating system
Warning
If the gateway is used for communication between the agent and the portal, install the Gateway Connector before installing the DCA and Cloud Connector agent.
Note
The installer is customized for each customer and cannot be used for customers other than the one selected at the time of generation.
-
Check the installation prerequisites at Prerequisites for installing the DCA and Cloud Connector agent
-
Run the downloaded file via Command Prompt
-
Navigate to the directory where the agent executable is located via Command Prompt
-
Enter the name of the executable (NDD - Network printer monitoring.exe or NDD - Local monitoring.exe)
-
Enter the other desired parameters, listed below
-
Example
C:\Downloads\DCA> NDD - Network printer monitoring.exe APPDIR=C:\test WORKFOLDER=C:\test /quiet
DCA and Cloud Connector silent installation parameters
The parameters with "*" are mandatory and must be observed.
The parameters with "**" may become mandatory depending on other parameters used.
Warning
The silent installation of DCA and Cloud Connector must be performed using the parameters documented below. The other options displayed in the installer help (/? or /help) should be disregarded.
APPDIR – Configures the installation directory of DCA and Cloud Connector
-
Setup option: enter the path where you want to install the agent.
-
Requirement: optional.
-
Behavior if not configured: installs in the default directory: C:\Program Files (x86)\NDD TECH\DCA and Cloud Connector.
-
Example: APPDIR=C:\test
WORKFOLDER – Configures the directory of the DCA and Cloud Connector work folder
-
Setup option: enter the path where you want to create the agent's work folder.
-
Requirement: optional.
-
Behavior if not configured: installs in the default directory: C:\NDD TECH\Workfolder.
-
Example: WORKFOLDER=C:\test
ENABLEPROXY – Enables the use of the proxy
-
Setup option: checked = enabled.
-
Requirement: optional (do not use the parameter if you do not want the proxy to be enabled).
-
Behavior if not configured: proxy will not be enabled.
-
Example: ENABLEPROXY=checked
**PROXYADDRESS – Configures the proxy server address
-
Setup option: enter the proxy address.
-
Requirement: mandatory if proxy use is enabled (ENABLEPROXY=checked).
-
Behavior if not configured: proxy will not be configured correctly.
-
Example: PROXYADDRESS=192.168.17.10
**PROXYPORT – Configures the communication port of the proxy server
-
Setup option: enter the proxy port number.
-
Requirement: mandatory if proxy use is enabled (ENABLEPROXY=checked).
-
Behavior if not configured: proxy will not be configured correctly.
-
Example: PROXYPORT=12
ENABLEGATEWAY - Enables the use of the gateway
-
Setup option: checked = enabled.
-
Requirement: optional (do not use the parameter if you do not want the gateway to be enabled).
-
Behavior if not configured: gateway will not be enabled.
-
Example: ENABLEGATEWAY=checked
**GATEWAYADDRESS - Configures the gateway address
-
Setup option: enter the address (IP or hostname) of the computer/server where the Gateway Connector was installed.
-
Requirement: mandatory if gateway use is enabled (ENABLEGATEWAY=checked).
-
Behavior if not configured: gateway will not be configured correctly.
-
Example: GATEWAYADDRESS=192.168.17.10
**GATEWAYPORT - Configures the communication port of the gateway
-
Setup option: enter the gateway port number.
The default gateway port is 9635, but you can enter another one if you wish. -
Requirement: mandatory if gateway use is enabled (ENABLEGATEWAY=checked).
-
Behavior if not configured: gateway will not be configured correctly.
-
Example: GATEWAYPORT=12
Step 3. Enable and configure monitoring rules
When installing the agent, no services will be enabled. The next step is to enable the service in the NDD Orbix portal according to your needs, so that the agent can take over the service and perform monitoring of the devices.
-
Go to Installations > Enable services
-
Locate the Network thermal printer monitoring option
-
Click on the Edit button
-
Enable the service
If you enable it, all the registered rules will be activated.
If you disable it, all the registered rules and the services that monitor network thermal printers (NDD - Thermal Monitor) will be deactivated. -
Click the Save button
-
Click on the Configure Rules button
By default, the NDD Orbix portal will have a rule registered for all customers and all computers, but disabled. You therefore need to create specific rules to configure network thermal printer monitoring for the computers you want.
-
Click the ✚ button in the top right corner
-
In the side tab, select the computer you want to enable network thermal printer monitoring on (the agents installed on the selected computer will be monitored)
-
Click the Add button to create the rule and remain on the add screen, or the Add and Close button to create the rule and return to the grid
You can select and add only one computer at a time.
When the rule is created, the services of the agents linked to the computer will be synchronized. The service will then be immediately available for other configurations.
If synchronization fails when the rule is created, select the desired rule in the grid and click the Synchronize button in the top right corner. If there is no synchronization, the service will only be available when the agent is next read.
If a rule is deleted and no new rules are registered for the same computer, device monitoring will stop.
Step 4. Configure the service
Access the documentation below to define which thermal printers will be monitored:
-
Configure addresses for searching network thermal printers for the service (mandatory configuration): to configure the addresses for searching for thermal printers.
-
Configure network thermal printer search for the service (optional configuration): to configure the scheduled search for thermal printers or start the search immediately.
-
Configure network thermal printer service synchronization (optional configuration): to configure service synchronization.
-
Configure network thermal printer service monitoring (optional configuration): to configure service monitoring.
-
Configure network thermal printer service communication (optional configuration): to configure service communication.
Step 5. Classify the thermal printers to be managed
Who can use this feature
Users with the Administrator or Manage new devices permission
After completing the previous steps, all network thermal printers identified by the agent will be automatically registered in the portal. From that point on, the system will begin collecting registration data, odometer readings, supplies, and events.
Newly identified thermal printers remain available in the Devices > New devices menu for up to 15 days. If no action is taken within this period, the printer will be automatically classified as managed.
For this reason, manual classification of thermal printers is an optional configuration. It allows the provider to evaluate newly identified printers and define which devices will be managed or unmanaged by the NDD Orbix portal before they are automatically classified as managed after the 15-day period.
Whenever the agent identifies new thermal printers on the network, they will be made available in the Devices > New devices menu for classification. At that point, the 15-day period will begin. The entry date can be found in the corresponding column of the grid.
If you want to classify the devices manually before automatic classification, follow the steps below:
-
Go to the Devices > New devices menu
-
Select the desired devices
-
To access the device properties, click on its name
-
-
Click the Manage or Not manage button
Depending on the classification performed:
-
Managed printers will be moved to the Devices > Inventory and Monitoring > Thermal printers menus.
-
Unmanaged printers will be moved to the Devices > Unmanaged menu.
In both cases, you can view the device’s entry date in the grid of the respective menu.
Warning
Moving a thermal printer between customers does not cause it to be considered a new device. However, when a printer is moved between providers, it is processed as a new device and will become available again in the Devices > New devices menu for classification.
As long as the thermal printer remains in the Devices > New devices menu, it will not be considered for provider billing purposes. However, the collection of registration data, odometer readings, supplies, and events will continue as usual.
Information
The initial classification defines the device’s status after it is identified, but the management status can be changed later, as instructed at Stop managing or return to managing thermal printers.
To view the inventory of managed thermal printers, access View thermal printer inventory.
USB thermal printers
USB thermal printers are identified and registered automatically on the portal after completing the configuration steps described in this documentation.
It is not possible to register thermal printers manually.
Instructions
Learn the first steps to start monitoring USB thermal printers. It starts with:
-
The installation of the DCA and Cloud Connector agent on the computer or server connected to the device to be monitored;
-
Enabling and configuring the monitoring rule;
-
The configuration of the service (optional);
-
The thermal printer classification to determine which ones will be managed by the NDD Orbix portal and which will not (optional).
Step 1. Generate the agent installer
Who can use this feature
Users with the Admin or Generate installer permissions
The installer is generated directly in the NDD Orbix portal and can be customized according to the organization's needs:
Warning
If the agent is already installed to monitor another device, it is not necessary to reinstall it on the same computer or server.
In this case, go directly to Step 3. Enable and configure monitoring rules and following.
Generate an installer with direct or proxy communication
-
Create the customer, as instructed at Create customer, site and department
-
After creating the customer, access the menu Installations > Installers > Generate installer
-
In the Install Local Monitoring option, click Select
-
Click Generate installer
-
In the side tab, select the desired customer
-
Click the Generate installer button
-
Copy the link of the generated installer or click Send by email to send the installer link to the configured emails
When pasted into the browser, the file download will start automatically.-
When you click Send by email, a side tab will open
-
Define the recipients:
-
System emails: select users registered on the NDD Orbix portal;
-
External emails: enter the email address in the field indicated and click Add. Repeat the process until you have included all the desired emails;
-
Both.
-
-
Click the Send installer button to immediately send the installer link to the configured emails
-
The link is valid for 90 days. After this period, you will need to generate a new installer.
Generate an installer with gateway communication
-
Create the customer, as instructed at Create customer, site and department
-
After creating the customer, access the menu Installations > Installers > Generate installer
-
In the Install Local Monitoring option, click Select
-
Click Customize
-
Select the desired customer
-
In the Communicator connection to the cloud field, if Gateway Connector is being used to communicate with NDD Orbix servers, enter the address (IP or hostname) and port of the computer/server where Gateway Connector was installed, in the following format: IP:port
If filled in, the address and port will be predefined in the installer.
Example
192.168.0.1:9635
Information
To install Gateway Connector, access Install the Gateway Connector on Windows.
-
Click the Generate installer button
-
Copy the link of the generated installer or click Send by email to send the installer link to the configured emails
When pasted into the browser, the file download will start automatically.-
When you click Send by email, a side tab will open
-
Define the recipients:
-
System emails: select users registered on the NDD Orbix portal;
-
External emails: enter the email address in the field indicated and click Add. Repeat the process until you have included all the desired emails;
-
Both.
-
-
Click the Send installer button to immediately send the installer link to the configured emails
-
The link is valid for 90 days. After this period, you will need to generate a new installer.
Step 2. Install the agent in the environment
Currently, the installation of DCA and Cloud Connector for monitoring USB thermal printers is only available for Windows operating systems.
Install manually on Windows operating system
Warning
If the gateway is used for communication between the agent and the portal, install the Gateway Connector before installing the DCA and Cloud Connector agent.
Note
The installer is customized for each customer and cannot be used for customers other than the one selected at the time of generation.
-
Check the installation prerequisites at Prerequisites for installing the DCA and Cloud Connector agent
-
Access the link generated by the portal to download the installer
-
Run the downloaded file
-
Select the desired language and click Próximo
First, the NDD - Queues Monitor, Microsoft .NET Runtime, Microsoft ASP.NET Core Runtime, and EpsonNet SDK for Windows applications will be installed. If they are already installed, steps 5 through 7 will be skipped, and the installation will proceed from step 8.
-
Click Next on the prerequisite installation welcome screen
-
Click Next to start installing the prerequisites
-
Wait for installation
Once the prerequisites have been installed, the installation of the DCA and Cloud Connector agent will begin.
-
Click Next on the agent installation welcome screen
-
Choose the Installation folder and Work folder and click Next
-
Click Next on the provider and customer information screen.
The fields will be filled in automatically according to the configurations generated in the installer portal. -
Under Additional settings, if desired, select the type of communication (proxy or gateway) and click Next
-
If no option is selected, communication will take place directly between the agent and the portal
-
If Use proxy for communication with NDD Orbix servers is selected, enter the necessary proxy connection settings (address, port and authentication, if any) and click Next
-
If Use Gateway Connector to communicate with NDD Orbix servers option is selected, enter the address (IP or hostname) and port of the computer/server where the Gateway Connector was installed and click Next
If the address and port have been previously configured in the NDD Orbix portal when generating the installer, these fields will already be filled in.
-
-
Click Install
-
Wait for installation and click Finish
Install silently on Windows operating system
Warning
If the gateway is used for communication between the agent and the portal, install the Gateway Connector before installing the DCA and Cloud Connector agent.
Note
The installer is customized for each customer and cannot be used for customers other than the one selected at the time of generation.
-
Check the installation prerequisites at Prerequisites for installing the DCA and Cloud Connector agent
-
Run the downloaded file via Command Prompt
-
Navigate to the directory where the agent executable is located via Command Prompt
-
Enter the name of the executable (NDD - Network printer monitoring.exe or NDD - Local monitoring.exe)
-
Enter the other desired parameters, listed below
-
Example
C:\Downloads\DCA> NDD - Network printer monitoring.exe APPDIR=C:\test WORKFOLDER=C:\test /quiet
DCA and Cloud Connector silent installation parameters
The parameters with "*" are mandatory and must be observed.
The parameters with "**" may become mandatory depending on other parameters used.
Warning
The silent installation of DCA and Cloud Connector must be performed using the parameters documented below. The other options displayed in the installer help (/? or /help) should be disregarded.
APPDIR – Configures the installation directory of DCA and Cloud Connector
-
Setup option: enter the path where you want to install the agent.
-
Requirement: optional.
-
Behavior if not configured: installs in the default directory: C:\Program Files (x86)\NDD TECH\DCA and Cloud Connector.
-
Example: APPDIR=C:\test
WORKFOLDER – Configures the directory of the DCA and Cloud Connector work folder
-
Setup option: enter the path where you want to create the agent's work folder.
-
Requirement: optional.
-
Behavior if not configured: installs in the default directory: C:\NDD TECH\Workfolder.
-
Example: WORKFOLDER=C:\test
ENABLEPROXY – Enables the use of the proxy
-
Setup option: checked = enabled.
-
Requirement: optional (do not use the parameter if you do not want the proxy to be enabled).
-
Behavior if not configured: proxy will not be enabled.
-
Example: ENABLEPROXY=checked
**PROXYADDRESS – Configures the proxy server address
-
Setup option: enter the proxy address.
-
Requirement: mandatory if proxy use is enabled (ENABLEPROXY=checked).
-
Behavior if not configured: proxy will not be configured correctly.
-
Example: PROXYADDRESS=192.168.17.10
**PROXYPORT – Configures the communication port of the proxy server
-
Setup option: enter the proxy port number.
-
Requirement: mandatory if proxy use is enabled (ENABLEPROXY=checked).
-
Behavior if not configured: proxy will not be configured correctly.
-
Example: PROXYPORT=12
ENABLEGATEWAY - Enables the use of the gateway
-
Setup option: checked = enabled.
-
Requirement: optional (do not use the parameter if you do not want the gateway to be enabled).
-
Behavior if not configured: gateway will not be enabled.
-
Example: ENABLEGATEWAY=checked
**GATEWAYADDRESS - Configures the gateway address
-
Setup option: enter the address (IP or hostname) of the computer/server where the Gateway Connector was installed.
-
Requirement: mandatory if gateway use is enabled (ENABLEGATEWAY=checked).
-
Behavior if not configured: gateway will not be configured correctly.
-
Example: GATEWAYADDRESS=192.168.17.10
**GATEWAYPORT - Configures the communication port of the gateway
-
Setup option: enter the gateway port number.
The default gateway port is 9635, but you can enter another one if you wish. -
Requirement: mandatory if gateway use is enabled (ENABLEGATEWAY=checked).
-
Behavior if not configured: gateway will not be configured correctly.
-
Example: GATEWAYPORT=12
Step 3. Enable and configure monitoring rules
Who can use this feature
Users with the Admin or Managing service rules and Enable or disable general service rule permissions
When installing the agent, no services will be enabled. The next step is to enable the service in the NDD Orbix portal according to your needs, so that the agent can take over the service and perform device monitoring.
-
Go to Installations > Enable services
-
Locate the USB thermal printers monitoring option
-
Click on the Edit button
-
Enable the service
If you enable it, all the registered rules will be activated.
If you disable it, all the registered rules and the services that monitor USB thermal printers (NDD - Thermal Monitor USB) will be deactivated. -
Click the Save button
-
Click on the Configure Rules button
By default, the NDD Orbix portal will have a rule registered for all customers and all computers, but disabled. You therefore need to create specific rules to configure USB thermal printer monitoring for the desired customers/computers.
Create rule by customer
The agents installed on all the computers allocated to the selected customers will be monitored.
-
Click the Create > Create rule by customer button
-
Check All if you want the rule to apply to all customers (agents installed on all computers allocated to all customers will be monitored) or Specific client(s) if you want to add which customers the rule will apply to (all computers of the selected customers will be monitored)
-
If the Specific client(s) option is chosen, click the + Add button
-
Select the customers you want to add to the rule
-
Click the Add button to add and remain on the add screen or the Add and Close button to add and return to the page
-
-
Enable or disable the rule
If you enable and save the rule, it will be active for the selected customers.
If you disable and save the rule, it will be registered but not active.
To change the rule's status, you must register it again with the desired status. -
Click the Save button to create the rule
If a rule is deleted and no new rules are registered for the same customer or computer, device monitoring will stop.
Create rule by computers
The agents installed on the selected computers will be monitored.
-
Click the Create > Create rule by computers button
-
Check All if you want the rule to apply to all computers (agents installed on all computers allocated to all customers will be monitored) or Specific computer(s) if you want to add which computers the rule will apply to (the selected computers will be monitored)
-
If the Specific computer(s) option is chosen, click the + Add button
-
Select the computers you want to add to the rule
-
Click the Add button to add and remain on the add screen or the Add and Close button to add and return to the page
-
-
Enable or disable the rule
If you enable and save the rule, it will be active for the selected computers.
If you disable and save the rule, it will be registered but not active.
To change the rule's status, you must re-register it with the desired status. -
Click the Save button to create the rule
If a rule is deleted and no new rules are registered for the same customer or computer, device monitoring will stop.
Step 4. Configure the service
Access the documentation below to configure the service, if you want:
-
Configure USB thermal printer service synchronization (optional configuration): to configure service synchronization.
-
Configure USB thermal printer service monitoring (optional configuration): to configure service monitoring.
Step 5. Classify the thermal printers to be managed
Who can use this feature
Users with the Administrator or Manage new devices permission
After completing the previous steps, all USB thermal printers identified by the agent will be automatically registered in the portal. From that point on, the system will begin collecting registration data, odometer readings, supplies, and events.
Newly identified thermal printers remain available in the Devices > New devices menu for up to 15 days. If no action is taken within this period, the printer will be automatically classified as managed.
For this reason, manual classification of thermal printers is an optional configuration. It allows the provider to evaluate newly identified printers and define which devices will be managed or unmanaged by the NDD Orbix portal before they are automatically classified as managed after the 15-day period.
Whenever the agent identifies new connected thermal printers, they will be made available in the Devices > New devices menu for classification. At that point, the 15-day period will begin. The entry date can be found in the corresponding column of the grid.
If you want to classify the devices manually before automatic classification, follow the steps below:
-
Go to the Devices > New devices menu
-
Select the desired devices
-
To access the device properties, click on its name
-
-
Click the Manage or Not manage button
Depending on the classification performed:
-
Managed printers will be moved to the Devices > Inventory and Monitoring > Thermal printers menus.
-
Unmanaged printers will be moved to the Devices > Unmanaged menu.
In both cases, you can view the device’s entry date in the grid of the respective menu.
Warning
Moving a thermal printer between customers does not cause it to be considered a new device. However, when a printer is moved between providers, it is processed as a new device and will become available again in the Devices > New devices menu for classification.
As long as the thermal printer remains in the Devices > New devices menu, it will not be considered for provider billing purposes. However, the collection of registration data, odometer readings, supplies, and events will continue as usual.
Information
The initial classification defines the device’s status after it is identified, but the management status can be changed later, as instructed at Stop managing or return to managing thermal printers.
To view the inventory of managed thermal printers, access View thermal printer inventory.
Computers
Computers are identified and registered automatically on the portal after completing the steps described in this documentation.
It is not possible to register thermal printers manually.
Instructions
Learn the first steps to start monitoring computers. It begins with:
-
The installation of the DCA and Cloud Connector agent on all computers to be monitored;
-
Enabling and configuring monitoring rules;
-
The computer classification to determine which ones will be managed by the NDD Orbix portal and which will not (optional).
Step 1. Generate the agent installer
Who can use this feature
Users with the Admin or Generate installer permissions
The installer is generated directly in the NDD Orbix portal and can be customized according to the organization's needs:
Warning
If the agent is already installed to monitor another device, it is not necessary to reinstall it on the same computer.
In this case, go directly to Step 3. Enable and configure monitoring rules and following.
Generate an installer with direct or proxy communication
-
Create the customer, as instructed at Create customer, site and department
-
After creating the customer, access the menu Installations > Installers > Generate installer
-
In the Install Local Monitoring option, click Select
-
Click Generate installer
-
In the side tab, select the desired customer
-
Click the Generate installer button
-
Copy the link of the generated installer or click Send by email to send the installer link to the configured emails
When pasted into the browser, the file download will start automatically.-
When you click Send by email, a side tab will open
-
Define the recipients:
-
System emails: select users registered on the NDD Orbix portal;
-
External emails: enter the email address in the field indicated and click Add. Repeat the process until you have included all the desired emails;
-
Both.
-
-
Click the Send installer button to immediately send the installer link to the configured emails
-
The link is valid for 90 days. After this period, you will need to generate a new installer.
Generate an installer with gateway communication
-
Create the customer, as instructed at Create customer, site and department
-
After creating the customer, access the menu Installations > Installers > Generate installer
-
In the Install Local Monitoring option, click Select
-
Click Customize
-
Select the desired customer
-
In the Communicator connection to the cloud field, if Gateway Connector is being used to communicate with NDD Orbix servers, enter the address (IP or hostname) and port of the computer/server where Gateway Connector was installed, in the following format: IP:port
If filled in, the address and port will be predefined in the installer.
Example
192.168.0.1:9635
Information
To install Gateway Connector, access Install the Gateway Connector on Windows.
-
Click the Generate installer button
-
Copy the link of the generated installer or click Send by email to send the installer link to the configured emails
When pasted into the browser, the file download will start automatically.-
When you click Send by email, a side tab will open
-
Define the recipients:
-
System emails: select users registered on the NDD Orbix portal;
-
External emails: enter the email address in the field indicated and click Add. Repeat the process until you have included all the desired emails;
-
Both.
-
-
Click the Send installer button to immediately send the installer link to the configured emails
-
The link is valid for 90 days. After this period, you will need to generate a new installer.
Step 2. Install the agent in the environment
Currently, the installation of DCA and Cloud Connector for computer monitoring is only available for Windows operating systems.
Install manually on Windows operating system
Warning
If the gateway is used for communication between the agent and the portal, install the Gateway Connector before installing the DCA and Cloud Connector agent.
Note
The installer is customized for each customer and cannot be used for customers other than the one selected at the time of generation.
-
Check the installation prerequisites at Prerequisites for installing the DCA and Cloud Connector agent
-
Access the link generated by the portal to download the installer
-
Run the downloaded file
-
Select the desired language and click Próximo
First, the NDD - Queues Monitor, Microsoft .NET Runtime, Microsoft ASP.NET Core Runtime, and EpsonNet SDK for Windows applications will be installed. If they are already installed, steps 5 through 7 will be skipped, and the installation will proceed from step 8.
-
Click Next on the prerequisite installation welcome screen
-
Click Next to start installing the prerequisites
-
Wait for installation
Once the prerequisites have been installed, the installation of the DCA and Cloud Connector agent will begin.
-
Click Next on the agent installation welcome screen
-
Choose the Installation folder and Work folder and click Next
-
Click Next on the provider and customer information screen.
The fields will be filled in automatically according to the configurations generated in the installer portal. -
Under Additional settings, if desired, select the type of communication (proxy or gateway) and click Next
-
If no option is selected, communication will take place directly between the agent and the portal
-
If Use proxy for communication with NDD Orbix servers is selected, enter the necessary proxy connection settings (address, port and authentication, if any) and click Next
-
If Use Gateway Connector to communicate with NDD Orbix servers option is selected, enter the address (IP or hostname) and port of the computer/server where the Gateway Connector was installed and click Next
If the address and port have been previously configured in the NDD Orbix portal when generating the installer, these fields will already be filled in.
-
-
Click Install
-
Wait for installation and click Finish
Install silently on Windows operating system
Warning
If the gateway is used for communication between the agent and the portal, install the Gateway Connector before installing the DCA and Cloud Connector agent.
Note
The installer is customized for each customer and cannot be used for customers other than the one selected at the time of generation.
-
Check the installation prerequisites at Prerequisites for installing the DCA and Cloud Connector agent
-
Run the downloaded file via Command Prompt
-
Navigate to the directory where the agent executable is located via Command Prompt
-
Enter the name of the executable (NDD - Network printer monitoring.exe or NDD - Local monitoring.exe)
-
Enter the other desired parameters, listed below
-
Example
C:\Downloads\DCA> NDD - Network printer monitoring.exe APPDIR=C:\test WORKFOLDER=C:\test /quiet
DCA and Cloud Connector silent installation parameters
The parameters with "*" are mandatory and must be observed.
The parameters with "**" may become mandatory depending on other parameters used.
Warning
The silent installation of DCA and Cloud Connector must be performed using the parameters documented below. The other options displayed in the installer help (/? or /help) should be disregarded.
APPDIR – Configures the installation directory of DCA and Cloud Connector
-
Setup option: enter the path where you want to install the agent.
-
Requirement: optional.
-
Behavior if not configured: installs in the default directory: C:\Program Files (x86)\NDD TECH\DCA and Cloud Connector.
-
Example: APPDIR=C:\test
WORKFOLDER – Configures the directory of the DCA and Cloud Connector work folder
-
Setup option: enter the path where you want to create the agent's work folder.
-
Requirement: optional.
-
Behavior if not configured: installs in the default directory: C:\NDD TECH\Workfolder.
-
Example: WORKFOLDER=C:\test
ENABLEPROXY – Enables the use of the proxy
-
Setup option: checked = enabled.
-
Requirement: optional (do not use the parameter if you do not want the proxy to be enabled).
-
Behavior if not configured: proxy will not be enabled.
-
Example: ENABLEPROXY=checked
**PROXYADDRESS – Configures the proxy server address
-
Setup option: enter the proxy address.
-
Requirement: mandatory if proxy use is enabled (ENABLEPROXY=checked).
-
Behavior if not configured: proxy will not be configured correctly.
-
Example: PROXYADDRESS=192.168.17.10
**PROXYPORT – Configures the communication port of the proxy server
-
Setup option: enter the proxy port number.
-
Requirement: mandatory if proxy use is enabled (ENABLEPROXY=checked).
-
Behavior if not configured: proxy will not be configured correctly.
-
Example: PROXYPORT=12
ENABLEGATEWAY - Enables the use of the gateway
-
Setup option: checked = enabled.
-
Requirement: optional (do not use the parameter if you do not want the gateway to be enabled).
-
Behavior if not configured: gateway will not be enabled.
-
Example: ENABLEGATEWAY=checked
**GATEWAYADDRESS - Configures the gateway address
-
Setup option: enter the address (IP or hostname) of the computer/server where the Gateway Connector was installed.
-
Requirement: mandatory if gateway use is enabled (ENABLEGATEWAY=checked).
-
Behavior if not configured: gateway will not be configured correctly.
-
Example: GATEWAYADDRESS=192.168.17.10
**GATEWAYPORT - Configures the communication port of the gateway
-
Setup option: enter the gateway port number.
The default gateway port is 9635, but you can enter another one if you wish. -
Requirement: mandatory if gateway use is enabled (ENABLEGATEWAY=checked).
-
Behavior if not configured: gateway will not be configured correctly.
-
Example: GATEWAYPORT=12
Step 3. Enable and configure monitoring rules
Who can use this feature
Users with the Admin or Managing service rules and Enable or disable general service rule permissions
When installing the agent, no services will be enabled. The next step is to enable the service in the NDD Orbix portal according to your needs, so that the agent can take over the service and perform monitoring of the devices.
-
Go to Installations > Enable services
-
Locate the Computer monitoring option
-
Click on the Edit button
-
Enable the service
If you enable it, all the registered rules will be activated.
If you disable it, all the registered rules and the services that monitor computers (NDD - Computer Monitor) will be deactivated. -
Click the Save button
-
Click on the Configure Rules button
By default, the NDD Orbix portal will have a rule registered for all customers and all computers, but disabled. You therefore need to create specific rules to configure computer monitoring for the desired customers/computers.
Create rule by customer
The agents installed on all the computers allocated to the selected customers will be monitored.
-
Click the Create > Create rule by customer button
-
Check All if you want the rule to apply to all customers (agents installed on all computers allocated to all customers will be monitored) or Specific client(s) if you want to add which customers the rule will apply to (all computers of the selected customers will be monitored)
-
If the Specific client(s) option is chosen, click the + Add button
-
Select the customers you want to add to the rule
-
Click the Add button to add and remain on the add screen or the Add and Close button to add and return to the page
-
-
Enable or disable the rule
If you enable and save the rule, it will be active for the selected customers.
If you disable and save the rule, it will be registered but not active.
To change the rule's status, you must register it again with the desired status. -
Click the Save button to create the rule
If a rule is deleted and no new rules are registered for the same customer or computer, device monitoring will stop.
Create rule by computers
The agents installed on the selected computers will be monitored.
-
Click the Create > Create rule by computers button
-
Check All if you want the rule to apply to all computers (agents installed on all computers allocated to all customers will be monitored) or Specific computer(s) if you want to add which computers the rule will apply to (the selected computers will be monitored)
-
If the Specific computer(s) option is chosen, click the + Add button
-
Select the computers you want to add to the rule
-
Click the Add button to add and remain on the add screen or the Add and Close button to add and return to the page
-
-
Enable or disable the rule
If you enable and save the rule, it will be active for the selected computers.
If you disable and save the rule, it will be registered but not active.
To change the rule's status, you must re-register it with the desired status. -
Click the Save button to create the rule
If a rule is deleted and no new rules are registered for the same customer or computer, device monitoring will stop.
Step 4. Classify the computers to be managed
Who can use this feature
Users with the Administrator or Manage new devices permission
After completing the previous steps, all computers identified by the agent will be automatically registered in the portal. From that point on, the system will begin collecting data.
Newly identified computers remain available in the Devices > New devices menu for up to 15 days. If no action is taken within that period, the computer will be automatically classified as managed.
For this reason, manual classification of computers is an optional configuration. It allows the provider to evaluate newly identified computers and define which devices will be managed or unmanaged by the NDD Orbix portal before they are automatically classified as managed after the 15-day period.
Whenever the agent identifies new computers, they will be made available in the Devices > New devices menu for classification. At that point, the 15-day period will begin. The entry date can be found in the corresponding column of the grid.
If you want to classify the devices manually before automatic classification, follow the steps below:
-
Go to the Devices > New devices menu
-
Select the desired devices
-
To access the device properties, click on its name
-
-
Click the Manage or Not manage button
Depending on the classification performed:
-
Managed computers will be moved to the Devices > Inventory and Monitoring > Computers > Devices menus.
-
Unmanaged computers will be moved to the Devices > Unmanaged menu.
In both cases, you can view the device’s entry date in the grid of the respective menu.
Warning
Moving a computer between customers does not cause it to be considered a new device. However, when a computer is moved between providers, it is processed as a new device and will become available again in the Devices > New devices menu for classification.
As long as the computer remains in the Devices > New devices menu, it will not be considered for provider billing purposes. However, data collection will continue as usual.
Information
The initial classification defines the device’s status after it is identified, but the management status can be changed later, as instructed at Stop managing or return to managing computers.
To view the inventory of managed computers, access View computer inventory.
Software
Software can be registered on the NDD Orbix portal in two ways:
-
Manually: create the software manually. For more details, access Create software manually.
-
Automatically: follow the steps in this documentation so that the software is automatically identified and registered on the portal.
Instructions
Learn the first steps to start monitoring software on managed computers. It starts with:
-
The installation of the DCA and Cloud Connector agent on all computers whose software will be monitored;
-
Enabling and configuring monitoring rules.
Step 1. Generate the agent installer
Who can use this feature
Users with the Admin or Generate installer permissions
The installer is generated directly in the NDD Orbix portal and can be customized according to the organization's needs:
Warning
If the agent is already installed to monitor another device, it is not necessary to reinstall it on the same computer.
In this case, go directly to Step 3. Enable and configure monitoring rules and following.
Generate an installer with direct or proxy communication
-
Create the customer, as instructed at Create customer, site and department
-
After creating the customer, access the menu Installations > Installers > Generate installer
-
In the Install Local Monitoring option, click Select
-
Click Generate installer
-
In the side tab, select the desired customer
-
Click the Generate installer button
-
Copy the link of the generated installer or click Send by email to send the installer link to the configured emails
When pasted into the browser, the file download will start automatically.-
When you click Send by email, a side tab will open
-
Define the recipients:
-
System emails: select users registered on the NDD Orbix portal;
-
External emails: enter the email address in the field indicated and click Add. Repeat the process until you have included all the desired emails;
-
Both.
-
-
Click the Send installer button to immediately send the installer link to the configured emails
-
The link is valid for 90 days. After this period, you will need to generate a new installer.
Generate an installer with gateway communication
-
Create the customer, as instructed at Create customer, site and department
-
After creating the customer, access the menu Installations > Installers > Generate installer
-
In the Install Local Monitoring option, click Select
-
Click Customize
-
Select the desired customer
-
In the Communicator connection to the cloud field, if Gateway Connector is being used to communicate with NDD Orbix servers, enter the address (IP or hostname) and port of the computer/server where Gateway Connector was installed, in the following format: IP:port
If filled in, the address and port will be predefined in the installer.
Example
192.168.0.1:9635
Information
To install Gateway Connector, access Install the Gateway Connector on Windows.
-
Click the Generate installer button
-
Copy the link of the generated installer or click Send by email to send the installer link to the configured emails
When pasted into the browser, the file download will start automatically.-
When you click Send by email, a side tab will open
-
Define the recipients:
-
System emails: select users registered on the NDD Orbix portal;
-
External emails: enter the email address in the field indicated and click Add. Repeat the process until you have included all the desired emails;
-
Both.
-
-
Click the Send installer button to immediately send the installer link to the configured emails
-
The link is valid for 90 days. After this period, you will need to generate a new installer.
Step 2. Install the agent in the environment
Currently, the installation of DCA and Cloud Connector for remote queue and driver administration is only available for Windows operating systems.
Install manually on Windows operating system
Warning
If the gateway is used for communication between the agent and the portal, install the Gateway Connector before installing the DCA and Cloud Connector agent.
Note
The installer is customized for each customer and cannot be used for customers other than the one selected at the time of generation.
-
Check the installation prerequisites at Prerequisites for installing the DCA and Cloud Connector agent
-
Access the link generated by the portal to download the installer
-
Run the downloaded file
-
Select the desired language and click Próximo
First, the NDD - Queues Monitor, Microsoft .NET Runtime, Microsoft ASP.NET Core Runtime, and EpsonNet SDK for Windows applications will be installed. If they are already installed, steps 5 through 7 will be skipped, and the installation will proceed from step 8.
-
Click Next on the prerequisite installation welcome screen
-
Click Next to start installing the prerequisites
-
Wait for installation
Once the prerequisites have been installed, the installation of the DCA and Cloud Connector agent will begin.
-
Click Next on the agent installation welcome screen
-
Choose the Installation folder and Work folder and click Next
-
Click Next on the provider and customer information screen.
The fields will be filled in automatically according to the configurations generated in the installer portal. -
Under Additional settings, if desired, select the type of communication (proxy or gateway) and click Next
-
If no option is selected, communication will take place directly between the agent and the portal
-
If Use proxy for communication with NDD Orbix servers is selected, enter the necessary proxy connection settings (address, port and authentication, if any) and click Next
-
If Use Gateway Connector to communicate with NDD Orbix servers option is selected, enter the address (IP or hostname) and port of the computer/server where the Gateway Connector was installed and click Next
If the address and port have been previously configured in the NDD Orbix portal when generating the installer, these fields will already be filled in.
-
-
Click Install
-
Wait for installation and click Finish
Install silently on Windows operating system
Warning
If the gateway is used for communication between the agent and the portal, install the Gateway Connector before installing the DCA and Cloud Connector agent.
Note
The installer is customized for each customer and cannot be used for customers other than the one selected at the time of generation.
-
Check the installation prerequisites at Prerequisites for installing the DCA and Cloud Connector agent
-
Run the downloaded file via Command Prompt
-
Navigate to the directory where the agent executable is located via Command Prompt
-
Enter the name of the executable (NDD - Network printer monitoring.exe or NDD - Local monitoring.exe)
-
Enter the other desired parameters, listed below
-
Example
C:\Downloads\DCA> NDD - Network printer monitoring.exe APPDIR=C:\test WORKFOLDER=C:\test /quiet
DCA and Cloud Connector silent installation parameters
The parameters with "*" are mandatory and must be observed.
The parameters with "**" may become mandatory depending on other parameters used.
Warning
The silent installation of DCA and Cloud Connector must be performed using the parameters documented below. The other options displayed in the installer help (/? or /help) should be disregarded.
APPDIR – Configures the installation directory of DCA and Cloud Connector
-
Setup option: enter the path where you want to install the agent.
-
Requirement: optional.
-
Behavior if not configured: installs in the default directory: C:\Program Files (x86)\NDD TECH\DCA and Cloud Connector.
-
Example: APPDIR=C:\test
WORKFOLDER – Configures the directory of the DCA and Cloud Connector work folder
-
Setup option: enter the path where you want to create the agent's work folder.
-
Requirement: optional.
-
Behavior if not configured: installs in the default directory: C:\NDD TECH\Workfolder.
-
Example: WORKFOLDER=C:\test
ENABLEPROXY – Enables the use of the proxy
-
Setup option: checked = enabled.
-
Requirement: optional (do not use the parameter if you do not want the proxy to be enabled).
-
Behavior if not configured: proxy will not be enabled.
-
Example: ENABLEPROXY=checked
**PROXYADDRESS – Configures the proxy server address
-
Setup option: enter the proxy address.
-
Requirement: mandatory if proxy use is enabled (ENABLEPROXY=checked).
-
Behavior if not configured: proxy will not be configured correctly.
-
Example: PROXYADDRESS=192.168.17.10
**PROXYPORT – Configures the communication port of the proxy server
-
Setup option: enter the proxy port number.
-
Requirement: mandatory if proxy use is enabled (ENABLEPROXY=checked).
-
Behavior if not configured: proxy will not be configured correctly.
-
Example: PROXYPORT=12
ENABLEGATEWAY - Enables the use of the gateway
-
Setup option: checked = enabled.
-
Requirement: optional (do not use the parameter if you do not want the gateway to be enabled).
-
Behavior if not configured: gateway will not be enabled.
-
Example: ENABLEGATEWAY=checked
**GATEWAYADDRESS - Configures the gateway address
-
Setup option: enter the address (IP or hostname) of the computer/server where the Gateway Connector was installed.
-
Requirement: mandatory if gateway use is enabled (ENABLEGATEWAY=checked).
-
Behavior if not configured: gateway will not be configured correctly.
-
Example: GATEWAYADDRESS=192.168.17.10
**GATEWAYPORT - Configures the communication port of the gateway
-
Setup option: enter the gateway port number.
The default gateway port is 9635, but you can enter another one if you wish. -
Requirement: mandatory if gateway use is enabled (ENABLEGATEWAY=checked).
-
Behavior if not configured: gateway will not be configured correctly.
-
Example: GATEWAYPORT=12
Step 3. Enable and configure monitoring rules
Who can use this feature
Users with the Admin or Managing service rules and Enable or disable general service rule permissions
When installing the agent, no services will be enabled. The next step is to enable the service in the NDD Orbix portal according to your needs, so that the agent takes over the service and performs device monitoring.
Enable and configure computer monitoring rules
To enable and configure software monitoring rules, you must first enable computer monitoring.
-
Go to Installations > Enable services
-
Locate the Computer monitoring option
-
Click on the Edit button
-
Enable the service
If you enable it, all the registered rules will be activated.
If you disable it, all the registered rules and the services that monitor computers (NDD - Computer Monitor) will be deactivated. -
Click the Save button
-
Click on the Configure Rules button
By default, the NDD Orbix portal will have a rule registered for all customers and all computers, but disabled. You therefore need to create specific rules to configure computer monitoring for the desired customers/computers.
Create rule by customer
The agents installed on all the computers allocated to the selected customers will be monitored.
-
Click the Create > Create rule by customer button
-
Check All if you want the rule to apply to all customers (agents installed on all computers allocated to all customers will be monitored) or Specific client(s) if you want to add which customers the rule will apply to (all computers of the selected customers will be monitored)
-
If the Specific client(s) option is chosen, click the + Add button
-
Select the customers you want to add to the rule
-
Click the Add button to add and remain on the add screen or the Add and Close button to add and return to the page
-
-
Enable or disable the rule
If you enable and save the rule, it will be active for the selected customers.
If you disable and save the rule, it will be registered but not active.
To change the rule's status, you must register it again with the desired status. -
Click the Save button to create the rule
If a rule is deleted and no new rules are registered for the same customer or computer, device monitoring will stop.
Create rule by computers
The agents installed on the selected computers will be monitored.
-
Click the Create > Create rule by computers button
-
Check All if you want the rule to apply to all computers (agents installed on all computers allocated to all customers will be monitored) or Specific computer(s) if you want to add which computers the rule will apply to (the selected computers will be monitored)
-
If the Specific computer(s) option is chosen, click the + Add button
-
Select the computers you want to add to the rule
-
Click the Add button to add and remain on the add screen or the Add and Close button to add and return to the page
-
-
Enable or disable the rule
If you enable and save the rule, it will be active for the selected computers.
If you disable and save the rule, it will be registered but not active.
To change the rule's status, you must re-register it with the desired status. -
Click the Save button to create the rule
If a rule is deleted and no new rules are registered for the same customer or computer, device monitoring will stop.
Enable and configure software monitoring rules
After enabling and configuring the computer monitoring service, enable and configure the software monitoring service.
-
Go to Installations > Enable services
-
Locate the Software monitoring option
-
Click on the Edit button
-
Enable the service
If you enable it, all the registered rules will be activated.
If you disable it, all the registered rules and the services that monitor software (NDD - Software Monitor) will be deactivated. -
Click the Save button
-
Click on the Configure Rules button
By default, the NDD Orbix portal will have a rule registered for all customers and all computers, but disabled. You therefore need to create specific rules to configure software monitoring for the desired customers/computers.
Create rule by customer
The agents installed on all the computers allocated to the selected customers will be monitored.
-
Click the Create > Create rule by customer button
-
Check All if you want the rule to apply to all customers (agents installed on all computers allocated to all customers will be monitored) or Specific client(s) if you want to add which customers the rule will apply to (all computers of the selected customers will be monitored)
-
If the Specific client(s) option is chosen, click the + Add button
-
Select the customers you want to add to the rule
-
Click the Add button to add and remain on the add screen or the Add and Close button to add and return to the page
-
-
Enable or disable the rule
If you enable and save the rule, it will be active for the selected customers.
If you disable and save the rule, it will be registered but not active.
To change the rule's status, you must register it again with the desired status. -
Click the Save button to create the rule
If a rule is deleted and no new rules are registered for the same customer or computer, device monitoring will stop.
Create rule by computers
The agents installed on the selected computers will be monitored.
-
Click the Create > Create rule by computers button
-
Check All if you want the rule to apply to all computers (agents installed on all computers allocated to all customers will be monitored) or Specific computer(s) if you want to add which computers the rule will apply to (the selected computers will be monitored)
-
If the Specific computer(s) option is chosen, click the + Add button
-
Select the computers you want to add to the rule
-
Click the Add button to add and remain on the add screen or the Add and Close button to add and return to the page
-
-
Enable or disable the rule
If you enable and save the rule, it will be active for the selected computers.
If you disable and save the rule, it will be registered but not active.
To change the rule's status, you must re-register it with the desired status. -
Click the Save button to create the rule
If a rule is deleted and no new rules are registered for the same customer or computer, device monitoring will stop.
Once all of the above steps have been completed, and after the computers have been read by the agent, the software covered by the enabled rules will automatically be monitored and will be available in the inventory. To view the software inventory, access View software inventory.