
To start monitoring your devices, it is essential to install the DCA and Cloud Connector agent.
If the gateway is used for communication between the agent and the portal, follow these steps before installing the DCA and Cloud Connector agent:
Instructions
Information
Currently, the Linux agent only supports monitoring meters, supplies, and events for network printers (NDD - Printer Monitor service) and USB printers (NDD - Printer Monitor USB service).
For USB printers (NDD service - Printer Monitor USB), see the compatible models at Configure the DCA and Cloud Connector agent on Linux.
Note
This step-by-step has been approved for the Fedora distribution, but is compatible with other Linux distributions.
For installation on Ubuntu-based distributions, consult the specific documentation: Install the DCA and Cloud Connector agent on Linux (Ubuntu and Ubuntu-based distributions).
-
Create the customers where the agents will be installed
-
Check the installation prerequisites
-
Check that the computer is connected to the internet
-
Open the terminal
Manual installation
Step 5: install the agent
-
Run the command below in the terminal to install the agent:
sudo ./ndd-package.sh install ndd-dca-and-cloud-connector
-
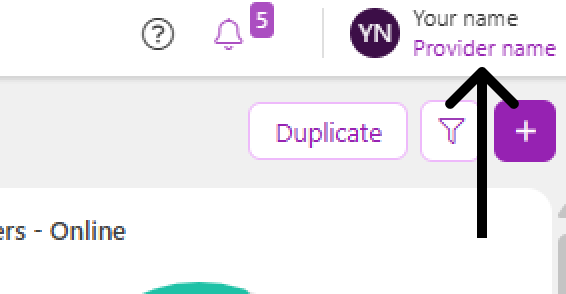
Enter the Tenant (provider name) and press Enter
Tip
How to find information on the portal:
-
Provider name: in the upper right corner, below your name:
-
Enter the Organization ID (customer identification key) and press Enter
Tip
How to find information on the portal:
-
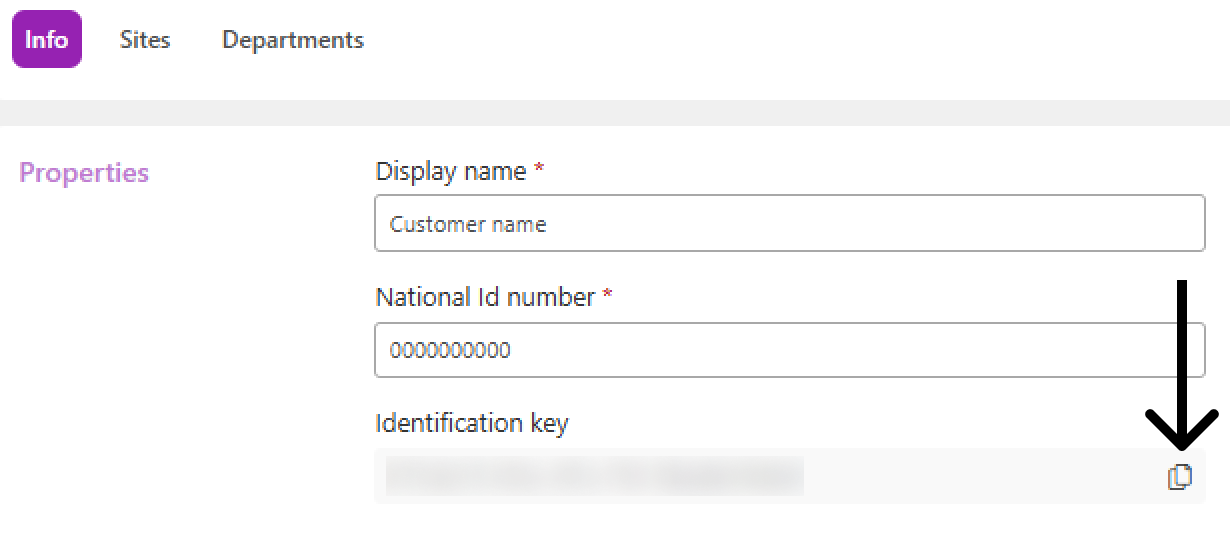
Customer identification key: in the customer properties:
-
Go to the Administration > Customers menu
-
Click on the name of the desired customer to open its properties
-
In the Info tab, copy the Identification key
The agent and service will be installed on the computer.
Silent installation
The ndd-package.sh script does not prompt for input in the terminal. However, during the initial installation, the postinst script for the ndd-dca-and-cloud-connector package prompts for the TENANT and ORGANIZATION_ID if the /etc/orbix/agent/appsettings.json file does not yet exist and this information has not been configured.
To keep the installation silent, specify TENANT and ORGANIZATION_ID in the command. Pass the variables along with sudo; an export command executed before sudo does not reach the installer.
Parameters for silent installation of DCA and Cloud Connector on Linux
|
Parameter |
Description |
Required |
Default |
Usage |
|---|---|---|---|---|
|
|
Provider name |
Yes, on first installation |
If not specified, it will be requested in the terminal |
DCA and Cloud Connector and services |
|
|
Customer identification key |
Yes, on first installation |
If not specified, it will be requested in the terminal |
DCA and Cloud Connector and services |
|
|
Version of the DCA and Cloud Connector agent to install |
No |
If not specified, the |
DCA and Cloud Connector |
|
|
IP address or hostname of the computer/server where the Gateway Connector is installed |
No |
|
DCA and Cloud Connector |
|
|
Gateway Connector port |
No |
|
DCA and Cloud Connector |
|
|
Source address for packages |
No |
|
All generic packages |
TENANT and ORGANIZATION_ID also apply to services if they are defined at the time of their installation. The terminal does not prompt for this information.
Choose one of the options below to install the DCA and Cloud Connector agent:
Install the DCA and Cloud Connector agent with direct communication
-
Copy the command below:
Bashsudo TENANT="tenant-name" \ ORGANIZATION_ID="client-id" \ ./ndd-package.sh install ndd-dca-and-cloud-connector 1.2.3 -
Paste it into the terminal
-
Replace
tenant-namewith the provider’s name
Tip
How to find information on the portal:
-
Provider name: in the upper right corner, below your name:
-
Replace
client-idwith the client identification key
Tip
How to find information on the portal:
-
Customer identification key: in the customer properties:
-
Go to the Administration > Customers menu
-
Click on the name of the desired customer to open its properties
-
In the Info tab, copy the Identification key
-
Replace
1.2.3with the specific version of the agent or remove1.2.3to install the latest version -
If you want to reinstall the same version, replace the command
./ndd-package.sh install ndd-dca-and-cloud-connector 1.2.3with./ndd-package.sh force-install ndd-dca-and-cloud-connector -
Run the adjusted command to install the agent
Install the DCA and Cloud Connector agent with gateway communication
-
Copy the command below:
Bashsudo TENANT="tenant-name" \ ORGANIZATION_ID="client-id" \ GATEWAY_HOST="127.0.0.1" \ GATEWAY_PORT="9635" \ ./ndd-package.sh install ndd-dca-and-cloud-connector 1.2.3 -
Paste it into the terminal
-
Replace
tenant-namewith the provider’s name
Tip
How to find information on the portal:
-
Provider name: in the upper right corner, below your name:
-
Replace
client-idwith the client identification key
Tip
How to find information on the portal:
-
Customer identification key: in the customer properties:
-
Go to the Administration > Customers menu
-
Click on the name of the desired customer to open its properties
-
In the Info tab, copy the Identification key
-
If you want, replace
127.0.0.1with the IP address or hostname of the computer/server where the Gateway Connector was installed -
If you want, replace
9635with the Gateway Connector port -
Replace
1.2.3with the specific version of the agent or remove1.2.3to install the latest version -
If you want to reinstall the same version, replace the command ./ndd-package.sh install ndd-dca-and-cloud-connector 1.2.3 with ./ndd-package.sh force-install ndd-dca-and-cloud-connector -
Run the adjusted command to install the agent
Install the network printer and/or USB printer monitoring service:
Install the network printer monitoring service
Follow the steps below to install the NDD - Printer Monitor service:
-
Copy the command below:
Bashsudo TENANT="tenant-name" \ ORGANIZATION_ID="client-id" \ ./ndd-package.sh install ndd-dca-printer-network-agent -
Paste it into the terminal
-
Replace
tenant-namewith the provider’s name
Tip
How to find information on the portal:
-
Provider name: in the upper right corner, below your name:
-
Replace
client-idwith the client identification key
Tip
How to find information on the portal:
-
Customer identification key: in the customer properties:
-
Go to the Administration > Customers menu
-
Click on the name of the desired customer to open its properties
-
In the Info tab, copy the Identification key
-
Run the adjusted command to install the service
Install the USB printer monitoring service
Follow the steps below to install the NDD - Printer Monitor USB service:
-
Copy the command below:
Bashsudo TENANT="tenant-name" \ ORGANIZATION_ID="client-id" \ ./ndd-package.sh install ndd-dca-printer-monitor-usb-agent -
Paste it into the terminal
-
Replace
tenant-namewith the provider’s name
Tip
How to find information on the portal:
-
Provider name: in the upper right corner, below your name:
-
Replace
client-idwith the client identification key
Tip
How to find information on the portal:
-
Customer identification key: in the customer properties:
-
Go to the Administration > Customers menu
-
Click on the name of the desired customer to open its properties
-
In the Info tab, copy the Identification key
-
Run the adjusted command to install the service