
To start monitoring your devices, it is essential to install the DCA and Cloud Connector agent.
Warning
If the gateway is used for communication between the agent and the portal, follow these steps before installing the DCA and Cloud Connector agent:
The installation is also compatible with Raspberry Pi devices that meet the minimum prerequisites.
Instructions
Information
Currently, the Linux agent only supports monitoring meters, supplies, and events for network printers (NDD - Printer Monitor service) and USB printers (NDD - Printer Monitor USB service).
For USB printers (NDD service - Printer Monitor USB), see the compatible models at Configure the DCA and Cloud Connector agent on Linux.
Note
This step-by-step has been approved for the Ubuntu distribution and the Debian and Mint distributions based on Ubuntu.
Other Ubuntu-based distributions have not been approved, but are likely to work. If you have any questions or incidents, please contact our support team.
-
Create the customers where the agents will be installed
-
Check the installation prerequisites
-
Check that the computer is connected to the internet
-
Open the terminal
Manual installation
Step 1: register in the NDD installer repository
-
Run the command below in the terminal:
sudo wget -O /usr/share/keyrings/ndd.public packages-orbix.ndd.tech/apt-repo/ndd.public
-
Run the command below in the terminal:
echo "deb [arch=amd64 signed-by=/usr/share/keyrings/ndd.public] https://packages-orbix.ndd.tech/apt-repo/ stable main" | sudo tee /etc/apt/sources.list.d/ndd.list
Warning
If the installation is being carried out on a Raspberry Pi device, replace the above command with the following:
echo "deb [arch=arm64 signed-by=/usr/share/keyrings/ndd.public] https://packages-orbix.ndd.tech/apt-repo/ stable main" | sudo tee /etc/apt/sources.list.d/ndd.list
-
Run the command below in the terminal:
sudo apt-get update
In newer versions of some distributions, the sudo apt-get update command may return the following error:
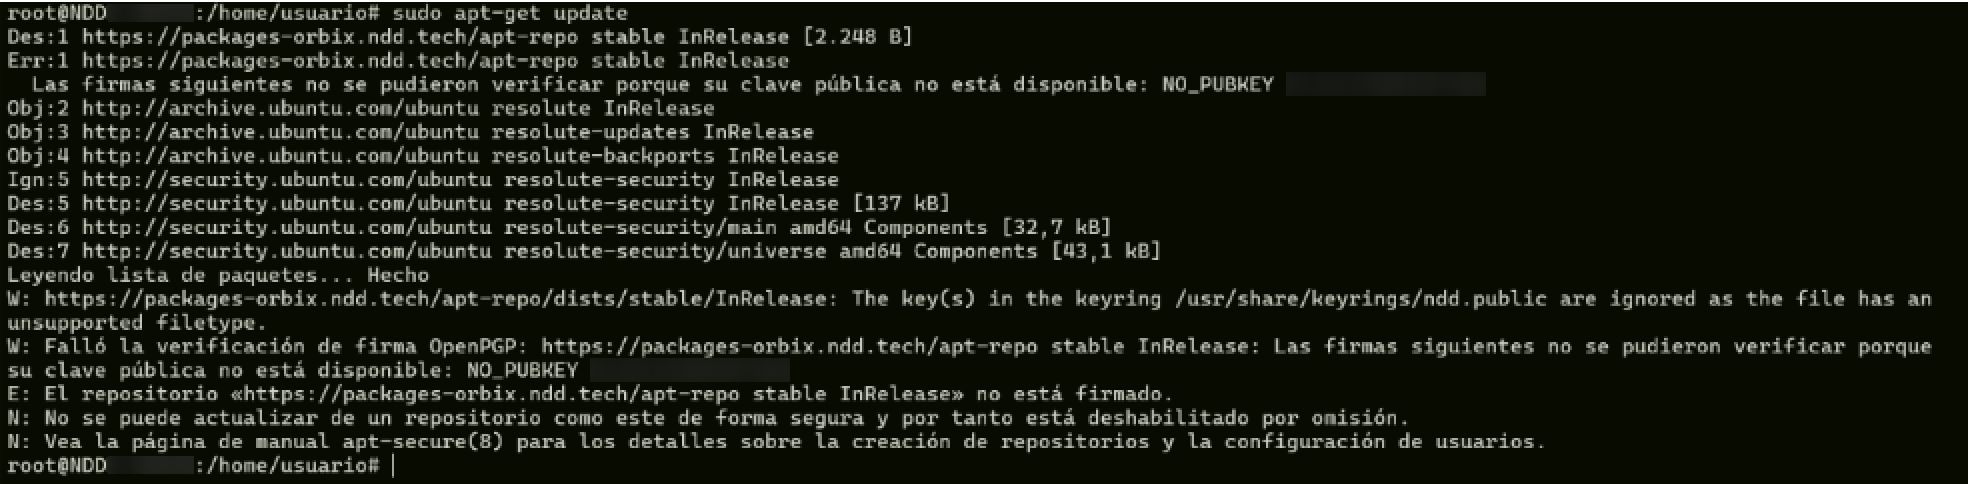
This occurs because modern versions of apt may not accept files in the ASCII-armored format and require a key in the .gpg format.
To fix the problem, convert the key to the .gpg format and update the repository configuration as instructed below:
-
Run the command below in the terminal to verify that the key is in the file:
Bashgpg --show-keys /usr/share/keyrings/ndd.public. -
If it is, run the command below in the terminal to convert the key to the
.gpgformat:Bashsudo gpg --dearmor -o /usr/share/keyrings/ndd.gpg /usr/share/keyrings/ndd.public -
Run the command below in the terminal to update the repository configuration:
Bashsudo sed -i 's|signed-by=/usr/share/keyrings/ndd.public|signed-by=/usr/share/keyrings/ndd.gpg|' /etc/apt/sources.list.d/ndd.list -
Run the command below in the terminal:
Bashsudo apt-get update
After running all the commands, the agent package will be available for installation.
Step 3: configure the agent
During installation, another screen will open for you to enter the agent's settings:
-
Enter the Tenant name (provider name) and press Enter
Tip
How to find information on the portal:
-
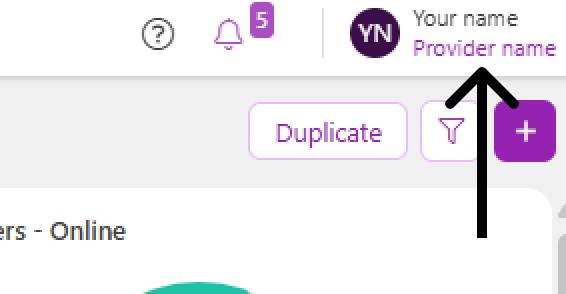
Provider name: in the upper right corner, below your name:
-
Enter the Organization id (customer identification key) and press Enter
Tip
How to find information on the portal:
-
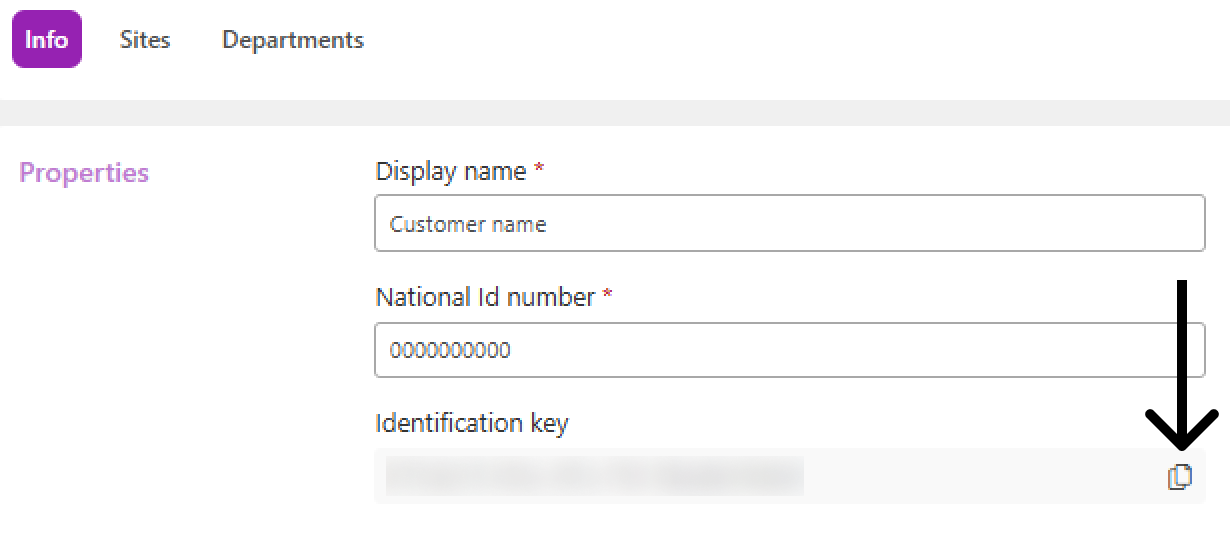
Customer identification key: in the customer properties:
-
Go to the Administration > Customers menu
-
Click on the name of the desired customer to open its properties
-
In the Info tab, copy the Identification key
-
To establish the type of communication between the agent and the portal (by proxy, gateway or direct):
-
Direct: in Do you want to use a proxy? and Do you want to use the Gateway Connector?, select No
-
Proxy: in Do you want to use a proxy?, select Yes
-
Enter the Proxy host (IP address or hostname of the proxy) and press Enter
-
Enter the Proxy port and press Enter
-
Enter the Proxy user (proxy authentication user), if any, and press Enter
-
Enter the Proxy password, if any, and press Enter
-
-
Gateway: in Do you want to use a proxy?, select No, and in Do you want to use the Gateway Connector?, select Yes
-
Enter the Gateway Connector host (IP address or hostname of the computer/server where the Gateway Connector was installed)
-
Enter the Gateway Connector port
The default gateway port is 9635, but you can enter another port if you wish.
-
-
-
When requested to confirm, type y and press Enter to proceed with the installation
The agent and service will be installed on the computer.
Silent installation
Environment variables do not configure the .deb. package. The ndd-dca-and-cloud-connector package reads the debconf settings. For a silent installation, record the responses before running apt and use DEBIAN_FRONTEND=noninteractive in the installation command.
The services do not require a tenant or organization_id and depend on the ndd-dca-and-cloud-connector package.
Parameters for silent installation of DCA and Cloud Connector on Linux
|
Parameter |
Description |
Required |
Default |
Usage |
|---|---|---|---|---|
|
|
Provider name |
Yes, on first installation |
- |
DCA and Cloud Connector |
|
|
Customer identification key |
Yes, on first installation |
- |
DCA and Cloud Connector |
|
|
Enables or disables proxy usage |
No |
|
DCA and Cloud Connector |
|
|
Proxy server address |
Yes, if |
- |
DCA and Cloud Connector |
|
|
Proxy server port |
Yes, if |
- |
DCA and Cloud Connector |
|
|
Proxy authentication user |
No |
- |
DCA and Cloud Connector |
|
|
Proxy authentication password |
No |
- |
DCA and Cloud Connector |
|
|
Enables or disables the use of the Gateway Connector |
No |
|
DCA and Cloud Connector |
|
|
IP address or hostname of the computer/server where the Gateway Connector is installed |
Yes, if |
|
DCA and Cloud Connector |
|
|
Gateway Connector port |
Yes, if |
|
DCA and Cloud Connector |
Choose one of the options below to install the DCA and Cloud Connector agent:
Install the DCA and Cloud Connector agent with direct communication
-
Copy the command below:
Bashsudo debconf-set-selections <<'EOF' ndd-dca-and-cloud-connector orbix/tenant string TENANT-NAME ndd-dca-and-cloud-connector orbix/organization_id string CLIENT-ID ndd-dca-and-cloud-connector orbix/configure_proxy select No ndd-dca-and-cloud-connector orbix/configure_gateway select No EOF sudo DEBIAN_FRONTEND=noninteractive apt-get install -y ndd-dca-and-cloud-connector -
Paste it into the terminal
-
Replace
TENANT-NAMEwith the provider’s name
Tip
How to find information on the portal:
-
Provider name: in the upper right corner, below your name:
-
Replace
CLIENT-IDwith the client identification key
Tip
How to find information on the portal:
-
Customer identification key: in the customer properties:
-
Go to the Administration > Customers menu
-
Click on the name of the desired customer to open its properties
-
In the Info tab, copy the Identification key
-
Run the adjusted command to install the agent
Install the DCA and Cloud Connector agent with proxy communication
-
Copy the command below:
Bashsudo debconf-set-selections <<'EOF' ndd-dca-and-cloud-connector orbix/tenant string TENANT-NAME ndd-dca-and-cloud-connector orbix/organization_id string CLIENT-ID ndd-dca-and-cloud-connector orbix/configure_proxy select Yes ndd-dca-and-cloud-connector orbix/proxy_host string 127.0.0.1 ndd-dca-and-cloud-connector orbix/proxy_port string 1234 ndd-dca-and-cloud-connector orbix/proxy_user string USER ndd-dca-and-cloud-connector orbix/proxy_pass password PASSWORD EOF sudo DEBIAN_FRONTEND=noninteractive apt-get install -y ndd-dca-and-cloud-connector -
Paste it into the terminal
-
Replace
TENANT-NAMEwith the provider’s name
Tip
How to find information on the portal:
-
Provider name: in the upper right corner, below your name:
-
Replace
CLIENT-IDwith the client identification key
Tip
How to find information on the portal:
-
Customer identification key: in the customer properties:
-
Go to the Administration > Customers menu
-
Click on the name of the desired customer to open its properties
-
In the Info tab, copy the Identification key
-
Replace
127.0.0.1with the IP address of the proxy server -
Replace
1234with the proxy server’s port -
If authentication is required, replace
USERandPASSWORDwith the proxy’s user name and password -
If no authentication is required, remove these two lines from the command:
ndd-dca-and-cloud-connector orbix/proxy_user string USER
ndd-dca-and-cloud-connector orbix/proxy_pass password PASSWORD -
Run the adjusted command to install the agent
Install the DCA and Cloud Connector agent with gateway communication
-
Copy the command below:
Bashsudo debconf-set-selections <<'EOF' ndd-dca-and-cloud-connector orbix/tenant string TENANT-NAME ndd-dca-and-cloud-connector orbix/organization_id string CLIENT-ID ndd-dca-and-cloud-connector orbix/configure_proxy select No ndd-dca-and-cloud-connector orbix/configure_gateway select Yes ndd-dca-and-cloud-connector orbix/gateway_host string 127.0.0.1 ndd-dca-and-cloud-connector orbix/gateway_port string 9635 EOF sudo DEBIAN_FRONTEND=noninteractive apt-get install -y ndd-dca-and-cloud-connector -
Paste it into the terminal
-
Replace
TENANT-NAMEwith the provider’s name
Tip
How to find information on the portal:
-
Provider name: in the upper right corner, below your name:
-
Replace
CLIENT-IDwith the client identification key
Tip
How to find information on the portal:
-
Customer identification key: in the customer properties:
-
Go to the Administration > Customers menu
-
Click on the name of the desired customer to open its properties
-
In the Info tab, copy the Identification key
-
If you want, replace
127.0.0.1with the IP address or hostname of the computer/server where the Gateway Connector was installed -
If you want, replace
9635with the Gateway Connector port -
Run the adjusted command to install the agent
Install the network printer and/or USB printer monitoring service: